Overview of Geopolymer Bricks
Geopolymer bricks represent a shift in sustainable construction by eliminating cement and relying on aluminosilicate materials activated by alkaline solutions. These bricks reduce carbon emissions by up to 80 percent compared to traditional Portland cement products, as they avoid energy-intensive limestone kilns. Builders benefit from their high compressive strength and resistance to chemical attack, but success depends on thorough field testing before full-scale use.
Field tests confirm the bricks' integrity under real-world conditions, preventing costly failures. Inconsistent curing or poor mixing can lead to weaknesses that compromise structural performance. Early detection through simple assessments allows for adjustments that enhance longevity and environmental benefits.
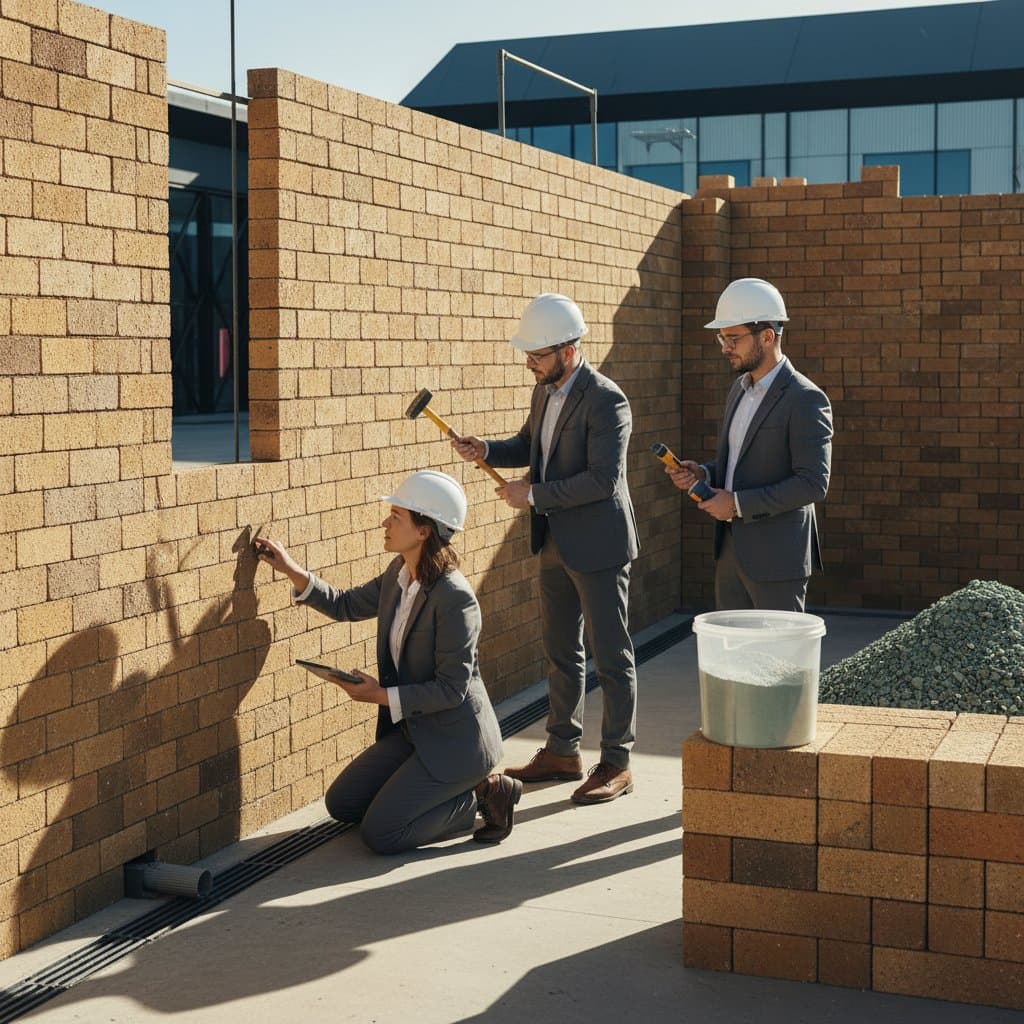
Key Field Tests for Quality Assurance
Homeowners and builders can perform straightforward field tests to verify the suitability of geopolymer bricks. These checks focus on physical properties that indicate proper binder reaction and material consistency. Documentation of test results supports compliance with building codes and informs project decisions.
Consider these essential evaluations:
-
Surface Texture Assessment: Examine the brick surface for density. A smooth, non-chalky finish indicates complete geopolymerization. Avoid bricks that release powder when rubbed, as this suggests incomplete curing.
-
Edge Integrity Check: Inspect edges for sharpness and resistance to chipping. Gently tap edges with a tool; resilient edges demonstrate strong bonding between aggregates and binder.
-
Weight Consistency Verification: Weigh several bricks from a pallet. Uniform weight, typically 20 to 30 percent lighter than clay bricks, confirms even material distribution and avoids surprises in handling.
-
Sound Test for Cure Quality: Strike two bricks together. A clear, high-pitched ring denotes a well-cured matrix with minimal voids. A muffled sound points to trapped moisture or inadequate reaction time.
-
Water Absorption Evaluation: Place a drop of water on the surface and time its penetration. Absorption under 10 percent by weight after 24 hours signals low porosity and effective water resistance. Rapid uptake indicates potential for freeze-thaw damage.
-
Color Uniformity Inspection: Scan for even coloration across bricks. Consistent hues reflect thorough mixing; variations may reveal segregation of fly ash or slag components.
Geopolymer bricks typically exhibit a sleek, uniform appearance distinct from the rustic texture of fired clay. Request supplier records on mix ratios, curing durations, and ambient conditions to validate these observations.
Identifying Warning Signs
Certain indicators during field inspections signal potential problems that could escalate repair costs or safety risks. Addressing these early preserves the bricks' advantages in durability and sustainability. Builders should halt installation if multiple red flags appear.
Watch for these concerns:
-
Crumbling edges or aggregate exposure, which erode structural integrity over time.
-
Efflorescence, appearing as white salt deposits, often from excess alkalis or water migration through the matrix.
-
Improper storage, such as pallets exposed to rain without covers, leading to premature degradation.
-
Absence of technical data, including compressive strength tests exceeding 5,000 psi for load-bearing applications.
-
Lack of certification for local building codes, especially in seismic or high-moisture zones.
-
Unrealistic promises, such as eternal zero-maintenance, ignoring the need for periodic inspections.
These issues often stem from manufacturing shortcuts or environmental exposure. Consult material safety data sheets to trace root causes and mitigate risks.
Common Issues and Cost-Effective Solutions
Geopolymer bricks may encounter challenges like surface scaling or joint failures, but targeted fixes restore performance without full replacement. Costs vary by scale, but proactive measures keep expenses manageable. Always prioritize solutions compatible with the geopolymer's chemistry to avoid adverse reactions.
-
Surface Scaling Repair: Apply a penetrating silicate sealer to harden the outer layer. This treatment costs $1 to $2 per square foot and improves abrasion resistance.
-
Joint Water Infiltration: Repoint with a geopolymer-compatible mortar to seal gaps. For an average wall, expect $3 to $5 per square foot, including preparation and tooling.
-
Individual Brick Cracks: Remove and replace affected units. Labor and materials total $5 to $8 per brick, depending on access and matching.
-
Drainage Deficiencies: Install or upgrade flashing and weep holes in veneer systems. Projects requiring scaffolding may cost $2,000 to $5,000 for a standard wall section.
Avoid generic sealants that create vapor barriers, as they can exacerbate internal moisture buildup. Conduct a thorough moisture audit, using tools like infrared cameras, to identify and resolve pathways before repairs.
Deciding Between Repair and Replacement
Evaluate the extent of damage to choose the most efficient path forward. Localized issues often warrant repairs, preserving the embedded sustainability benefits. Systemic flaws, however, necessitate replacement to ensure long-term reliability.
-
For Non-Structural Elements: Repair accent walls or facades if damage is superficial and drainage is adequate. Replace only when efflorescence persists despite treatment.
-
For Load-Bearing Walls: Conduct pull-out tests or core sampling; replace if strength drops below 80 percent of design specifications or cracks exceed 1/8 inch.
-
Mortar Compatibility: Select lime or geopolymer mortars for joints to prevent differential expansion. Portland cement mixtures accelerate deterioration through incompatible shrinkage.
-
Exterior Facing Repairs: Patch spalling with polymer-modified geopolymer renders. Proceed to full replacement after verifying foundation stability and movement joints.
Opt for repairs in cases of isolated defects, as they minimize waste and disruption. Replacement proves necessary when curing inconsistencies undermine the entire batch's performance.
Assembling the Right Team
Success with geopolymer bricks relies on expertise from the outset. A coordinated team ensures seamless integration and compliance. Early involvement prevents oversights that lead to rework.
-
Masonry Inspector: Engage a specialist in alternative materials for initial and ongoing assessments, including non-destructive testing.
-
Architect: Collaborate on design details, such as expansion joints and material transitions, to accommodate the bricks' thermal properties.
-
Structural Engineer: Perform calculations for shear and compressive loads, particularly in multi-story applications.
-
Experienced Contractor: Choose one with documented geopolymer projects; review photos of aged installations for weathering performance.
Implement parallel reviews, such as simultaneous lab testing and site mockups, to streamline approvals. Professional oversight adds 10 to 20 percent to budgets but reduces error-related expenses by up to 50 percent.
Prioritizing Project Scope
Focus efforts on elements that deliver the greatest impact on performance. Sequence tasks to build a solid foundation before aesthetic finishes. This approach maximizes the bricks' inherent strengths.
-
Establish comprehensive water management, including grading and below-grade barriers.
-
Install robust flashing systems and drip edges to direct runoff.
-
Confirm mortar adhesion through bond strength tests.
-
Apply sealers judiciously, only after verifying a moisture-free assembly.
Defer non-essential features, like ornamental cladding, until core systems function reliably. Retain viable existing masonry to honor its embodied energy and reduce project carbon footprint.
Planning Budget and Timeline
Structure the project around interdependencies to control costs and timelines. Moisture-sensitive steps dictate the sequence, ensuring each phase supports the next.
-
Address site drainage and divert roof water from walls.
-
Examine the foundation for levelness and settlement risks.
-
Validate brick and mortar properties via field and lab tests.
-
Integrate insulation and weather barriers.
-
Add protective finishes once the assembly stabilizes.
Allow 28 days minimum for initial curing under controlled humidity. Premature enclosure invites condensation issues that compromise binder integrity. Budget 15 percent contingency for testing and adjustments.
Ensuring Long-Term Performance
Geopolymer bricks demand vigilant upkeep to realize their full potential. Regular monitoring detects issues before they propagate. Simple habits sustain the investment's value.
Maintain clear gutters and extend downspouts at least 5 feet from foundations. Inspect for fine cracks annually, sealing them promptly with flexible geopolymer fillers. Clean surfaces gently with pH-neutral solutions to avoid etching the matrix.
Document all interventions, including dates and materials, for trend analysis. Protected from prolonged wetting and de-icing salts, these walls endure beyond conventional concrete. Adopt a routine visual sweep for alignment and drainage; this practice safeguards sustainability gains across project lifecycles.