Radiant Heat Driveways: Effortless Snow and Ice Removal Year-Round
Skill Level: Advanced DIY with professional consultation advised, or full professional installation
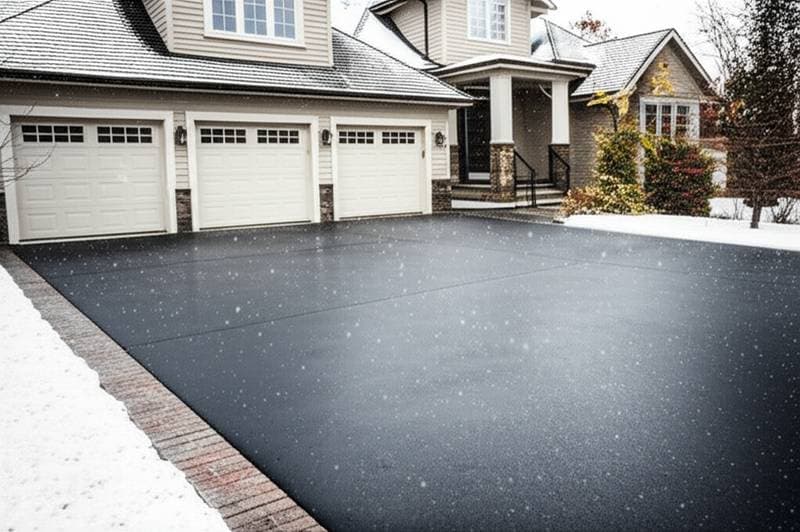
Radiant heat driveways represent a transformative approach to winter maintenance. These systems embed heating elements within the concrete slab to melt snow and ice automatically as precipitation falls. Homeowners gain a clear, safe surface without the physical demands of shoveling or the environmental impact of salt-based de-icers. Beyond convenience, the technology shields concrete from the destructive cycles of freezing and thawing, which often cause surface cracks and structural weakening over time. While the upfront investment proves substantial, the long-term savings in labor, repairs, and energy efficiency make it a worthwhile upgrade for properties in snowy regions.
Essential Considerations Before Starting
This installation qualifies as a significant undertaking that demands precision and coordination. Professionals typically handle the integration of heating components with concrete pouring and electrical or plumbing connections. For those pursuing a DIY route, prior experience with large-scale concrete projects and electrical systems becomes crucial. Engage a structural engineer or certified installer early to evaluate feasibility and comply with building codes. Budget for permits, materials, and potential utility upgrades, as costs can range from $10 to $20 per square foot depending on system type and site complexity.
Strategic Planning for Your Radiant Heat Driveway
Effective planning forms the foundation of a durable and efficient system. Begin by mapping the driveway layout and evaluating environmental variables to select the optimal heating method.
Site Evaluation Essentials
Examine the terrain for slope, existing drainage patterns, and soil composition. Inadequate drainage leads to water pooling beneath the slab, which diminishes heating effectiveness and promotes erosion. Aim for a minimum slope of one-quarter inch per foot to direct meltwater away from structures. Test soil for stability; clay-rich or loose areas require additional gravel or stabilization fabric to prevent settling that could damage heating elements.
Precise Measurements and Calculations
Record the driveway's dimensions in feet, multiplying length by width to determine square footage. Factor in a 10 percent buffer for overlaps, curves, and cutoffs. Hydronic systems necessitate calculations for tubing length based on flow rates and coverage; consult manufacturer charts for exact sizing. Electric systems require wattage estimates, typically 30 to 50 watts per square foot, to ensure uniform heating without overburdening circuits.
Key Environmental and Regulatory Factors
Account for local climate data, such as annual snowfall totals and days below freezing, to gauge system runtime and energy needs. Consider sun exposure and wind patterns, which influence natural thawing. Verify proximity to power sources for electric setups or boiler rooms for hydronic ones. Review municipal building codes for slab thickness requirements and energy efficiency standards, and check homeowner association rules that might restrict visible controls or exterior modifications.
Anticipating Installation Challenges
Pre-existing features like expansion joints, septic lines, or irrigation systems demand careful rerouting or protection. Uneven grades may require grading equipment to achieve a level base. Contact utility locating services via 811 at least two weeks in advance to identify and avoid underground hazards, preventing costly disruptions or safety risks.
Essential Tools and Materials Roundup
Assemble a comprehensive kit to streamline the process and uphold quality standards.
Core Hand Tools
- Tape measure: Essential for accurate layout and spacing verification.
- Bubble level and 10-foot straightedge: Critical for ensuring slab flatness and alignment.
- Bull float, darby, and edging trowels: Used sequentially for smoothing and finishing the concrete surface without disturbing embedded elements.
Vital Power Tools
- Portable concrete mixer or arrange for ready-mix truck delivery: Guarantees uniform consistency in large pours.
- Circular saw equipped with a diamond masonry blade: For cutting clean expansion joints post-cure.
- Hammer drill with mixing attachments: Ideal for blending reinforcement adhesives or repair mortars.
Recommended Rental Gear
- Vibratory plate compactor: Compacts gravel sub-base to prevent future shifts.
- Internal concrete vibrator: Eliminates voids around heating elements during pouring.
- Ground-thawing mats or portable heaters: Maintain workable temperatures if installing in sub-freezing conditions.
Comprehensive Materials Inventory
- Heating components: Select UL-listed electric cables (for smaller areas) or oxygen-barrier PEX tubing with manifolds (for larger zones).
- Protective elements: Rigid foam insulation boards (R-10 minimum) and wire mesh or rebar for reinforcement.
- Concrete specifications: 4,000 PSI mix with air-entrainment (5-7 percent) to resist freeze-thaw cycles.
- Controls and sensors: Slab-embedded moisture detectors, programmable thermostats, and GFCI-protected panels.
- Extras: Expansion joint foam, waterproof conduit, and sealants; procure 10 percent more heating materials to accommodate site-specific adjustments.
Detailed Installation Guide
Follow this sequence to integrate radiant heating seamlessly into your driveway construction.
-
Site Excavation and Base Preparation. Clear vegetation and old pavement to expose at least eight inches of depth. Compact the native soil with a roller, then layer and tamp four to six inches of clean gravel for optimal drainage and stability.
-
Insulation Installation. Place full-coverage foam boards over the gravel, seaming joints with tape to minimize thermal bridging. This step boosts efficiency by up to 50 percent, directing heat upward to the surface.
-
Heating Element Placement. Unroll cables or tubing in serpentine patterns, adhering to manufacturer-recommended spacing of 3 to 6 inches on center for even coverage. Avoid tight bends that could kink lines and impair flow.
-
Securing and Pre-Pour Testing. Tie elements to the reinforcement grid using plastic zip ties, ensuring no crossings or excessive tension. Perform continuity tests on electric cables with a multimeter and pressure tests on hydronic lines to detect leaks or breaks.
-
Concrete Pouring Process. Schedule a single, continuous pour to avoid cold joints. Distribute mix evenly, vibrating thoroughly around elements to embed them without displacement. Screed the surface level, maintaining the planned slope.
-
Surface Finishing Techniques. Once bleed water evaporates, float the slab to consolidate, then apply a broom finish for traction. Steer clear of over-troweling, which might abrade the surface and risk element exposure.
-
Curing and System Activation. Cover with curing blankets or plastic sheeting for 7 to 14 days, keeping the slab moist to achieve full strength. Connect and test controls only after complete curing, calibrating sensors for automatic activation at 35 degrees Fahrenheit.
Pitfalls to Sidestep During Installation
- Neglecting sub-slab insulation, which wastes energy and extends melt times.
- Proceeding to pour without verifying element integrity, leading to inaccessible repairs.
- Incorrect spacing or overlapping loops, resulting in hot spots or cold zones.
- Overlooking drainage integration, which causes refreezing and system strain.
Maximizing Longevity and Performance
Post-installation maintenance ensures your radiant heat driveway delivers reliable service for decades. Schedule annual inspections to check for cable insulation integrity or tubing leaks, particularly around expansion joints. Clean sensors regularly to maintain accurate activation, and integrate the system with smart home controls for remote monitoring and energy optimization. By investing in quality components and professional tuning, homeowners realize not only freedom from winter chores but also enhanced property value through superior safety and curb appeal. This forward-thinking solution redefines seasonal resilience, allowing focus on enjoyment rather than endurance.