- Key Decision Factors: Soil composition, foundation type, climate conditions, and budget
How Smart Foundation Sensors Operate
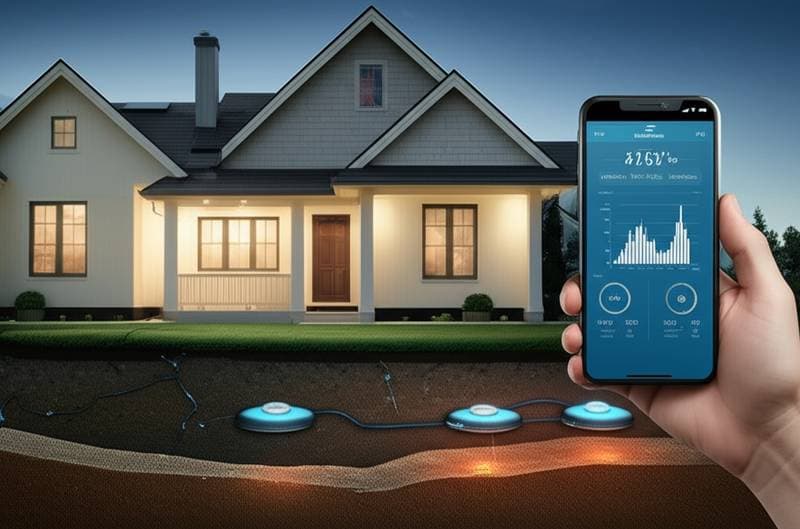
Smart foundation monitoring systems integrate motion sensors, tilt meters, and moisture detectors to monitor environmental and structural changes. These components send data to a central hub that analyzes patterns and compares them to initial benchmarks. If the system identifies unusual movement or moisture fluctuations, it delivers immediate notifications to your smartphone or online dashboard.
Primary Sensor Categories
- Tilt sensors: These devices gauge angular shifts across the foundation surface. They reveal uneven settling or tilting that may indicate underlying stress.
- Displacement sensors: Capable of detecting lateral or vertical shifts with precision down to millimeters, these sensors spot soil movement or slab displacement.
- Moisture sensors: Positioned to track soil dampness adjacent to the foundation, they flag potential drainage problems or plumbing leaks early.
- Strain gauges: Embedded to measure tension or compression in foundation elements, these evaluate how well the structure supports loads.
Integrating data from these sensors creates an ongoing assessment of foundation stability. Advanced algorithms in the software forecast when shifts might surpass safe limits, enabling proactive measures.
Developing a Monitoring Plan
Establish a detailed strategy before deploying foundation monitoring tools, accounting for your foundation style, soil properties, and network capabilities.
Evaluating Foundation and Soil Conditions
- Slab-on-grade foundations: Install perimeter sensors to monitor slab inclination and surrounding soil humidity.
- Crawl space or pier-and-beam setups: Deploy vertical displacement and humidity sensors within subfloor zones.
- Basement foundations: Incorporate wall tilt monitors alongside groundwater level trackers.
Soil characteristics play a pivotal role in foundation behavior. Clays that expand and contract with water content pose risks of significant movement, whereas sandy soils lead to slower subsidence. Areas experiencing freeze-thaw cycles face frost heave, prompting seasonal adjustments. Tailor sensor numbers, positions, and burial depths to these regional factors for optimal coverage.
Navigating Permits and Regulations
Residential setups typically bypass permit requirements, though certain areas treat wired systems as low-voltage electrical installations. Review local codes prior to cabling or core-drilling into concrete surfaces to ensure compliance.
Selecting Connectivity and Power Options
Dependable data transmission demands robust Wi-Fi or cellular options suited to enclosed spaces like basements. Battery-powered sensors often endure three to five years on a single charge, whereas wired variants connect to compact transformers for continuous operation.
Site Preparation Essentials
Thorough groundwork guarantees precise readings and sustained system effectiveness.
-
Examine the foundation edges: Identify cracks, poor drainage, or uneven settling indicators. Remedy any current issues to avoid skewed data.
-
Capture initial readings: Use a laser level or digital inclinometer to document current elevations. This reference point allows the system to quantify subsequent changes accurately.
-
Design sensor placement: Position units at intervals of 8 to 12 feet along key walls, corners, and joints. Bury moisture sensors 6 inches underground and 12 inches from the foundation wall.
-
Prepare attachment areas: Clear away dirt and residue, then secure sensors to concrete or brick with epoxy anchors or adhesive mounts.
Detailed Installation Guide
- Secure structural sensors: Fix tilt and displacement units at designated spots on walls. Confirm each is plumb and aligned per the manufacturer's guidelines.
- Opt for stainless steel fasteners or epoxy bonds for durability.
- Mark positions clearly to simplify later adjustments.
-
Position moisture and soil probes: Insert them at uniform depths around the exterior. Steer clear of runoff zones or gutter outlets to prevent false readings.
-
Set up the central hub: Locate it in a protected indoor area with access to electricity. Link it to your Wi-Fi and test connectivity to every sensor.
-
Perform calibration: Adhere to app instructions to log starting conditions. The software relies on these to detect deviations.
-
Validate notifications: Trigger a minor simulated shift or humidity alteration to ensure alerts arrive via your app or dashboard.
Sustaining Precision and Durability
System reliability hinges on regular calibration and data quality. Preserve performance by:
- Recalibrating yearly or following intense weather occurrences.
- Clearing debris from soil sensors to avoid blockages.
- Applying firmware updates to align with evolving software.
- Arranging expert evaluations if alerts indicate shifts beyond 0.1 inch.
Premium setups retain accuracy over ten years with basic upkeep.
Resolving Typical Challenges
Erroneous alerts: Heavy rains can cause brief soil swelling; cross-check with a physical review to rule out real threats.
Signal interruptions: Inspect Wi-Fi coverage and power sources. For mesh setups, relocate nodes to enhance reception.
Calibration drift: Temperature swings may misalign sensors; reset via the mobile interface.
Inconsistent moisture data: Swap out probes displaying irregular outputs after extended dryness, as compacted soil impairs function.
Ongoing Upkeep and Data Handling
Consistent care supports dependable operation and insightful trend analysis.
- Check sensor enclosures biannually for water damage or rust.
- Swap batteries promptly to prevent interruptions.
- Download logs every three months to analyze patterns across seasons.
- Brush away buildup near ground sensors to inhibit growth or crusting.
Accumulated records reveal slow subsidence trends and measure intervention outcomes post-repairs.
Homeowner Installation Versus Expert Services
Individuals with basic technical know-how can manage wireless installations, potentially cutting costs by 30 percent. Professionals, however, provide precision tools for setup and seamless ties to full-home smart networks.
Expert Recommendations
- Define precise alert limits to minimize unnecessary notifications.
- Link foundation metrics with local weather data for better interpretation.
- Encase any visible wires in waterproof tubing.
- Analyze readings following storms or dry spells.
- Distribute access to alerts among family members.
Realizing Lasting Value
These sensors empower you with advance notice of potential issues. Rather than addressing sudden cracks or sticking doors, you act on alerts to perform targeted upkeep. This approach typically lowers repair bills by 20 to 40 percent while prolonging your foundation's integrity.