- Key decision factors: Consider home size, foundation type, soil conditions, local climate, and automation preferences when selecting a system and estimating costs.
Understanding Smart Foundation Monitoring
Smart foundation monitoring employs IoT-enabled sensors to track movement, moisture, and vibration in soil and structural components under a home. These sensors send data to a central hub for storage and analysis. If movement surpasses predefined thresholds, the system delivers immediate notifications via mobile app, text message, or email.
Types of Foundation Sensors
- Tilt sensors: Gauge angular changes or slope variations in slabs or walls.
- Displacement sensors: Measure linear shifts across cracks or joints, with precision down to fractions of an inch, such as 1/32 inch.
- Pressure sensors: Identify variations in soil or concrete stress, particularly beneficial in areas with expansive clay.
- Moisture sensors: Track water levels or humidity that could compromise soil integrity.
- Vibration sensors: Capture seismic activity or vibrations from nearby construction that impact stability.
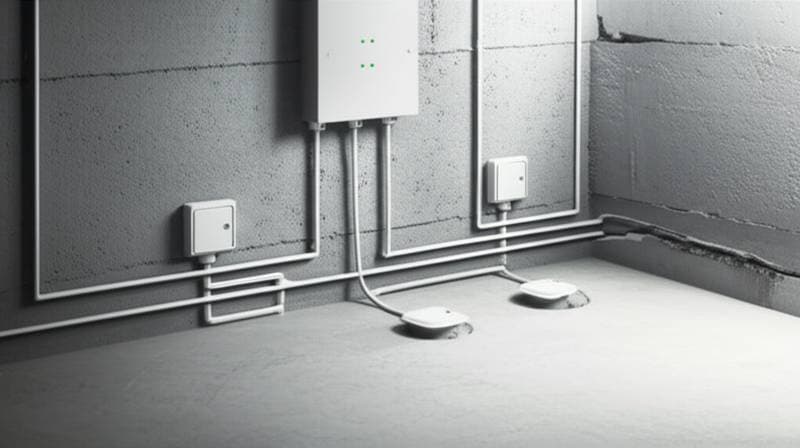
Systems often integrate multiple sensor types for thorough coverage. A smart hub manages data flow and relays information to a secure cloud for processing.
Why Monitoring Matters
Foundation shifts arise from factors like expansive clay soils, inadequate drainage, frost heave, or post-construction settling. Conventional inspections depend on visible indicators that emerge only after significant damage occurs. Real-time sensors identify subtle changes early, permitting adjustments to drainage, soil moisture, or structural support to halt progression. Such foresight typically cuts repair expenses by 40 to 70 percent relative to addressing advanced foundation issues.
Planning Your Smart Sensor System
Assessing Your Home and Soil
Begin by determining your foundation type, whether slab-on-grade, pier and beam, or basement. Slab foundations respond best to perimeter-placed sensors, whereas pier and beam setups demand monitoring at piers and load-bearing walls. Evaluate soil composition as well; expansive clays require additional moisture and pressure sensors, while sandy or loamy soils might suffice with basic units.
Permits and Codes
Sensor installations rarely demand special permits, though drilling into concrete or entering crawlspaces may necessitate adherence to local safety regulations. Powered devices in basements or crawlspaces could require electrical permits in certain regions. Consult manufacturer guidelines for optimal sensor depth and spacing to ensure compliance.
Cost Considerations
System expenses vary by sensor quantity and area covered:
- Small homes (1,000 to 1,500 square feet): 1,200 to 2,000 dollars.
- Medium homes (1,500 to 2,500 square feet): 2,000 to 3,000 dollars.
- Large homes (2,500 square feet and above): 3,000 to 4,000 dollars or higher.
Cloud platforms often include monthly fees of 10 to 25 dollars for data management, analytics, and app access. Optional professional monitoring adds 200 to 400 dollars annually, scaled to reporting needs.
Selecting the Right Sensors
Compare options based on these criteria:
- Accuracy: Detection limits in inches or degrees.
- Communication protocol: Options like Wi-Fi, Zigbee, Z-Wave, or cellular.
- Power source: Battery-operated or wired setups.
- Temperature tolerance: Suitability for outdoor or crawlspace environments.
- Data access: Features including cloud interfaces, app compatibility, and customizable alerts.
Select a system aligned with your home network and technical familiarity. Strong connectivity guarantees prompt notifications, while local storage provides backup reliability.
Preparing the Site and Equipment
Verify Wi-Fi reach to all intended sensor spots prior to setup; install repeaters if coverage falls short. Remove obstacles like debris, plants, or insulation near the foundation to facilitate secure attachment and precise readings.
Required Materials and Tools
- Smart sensors: Select appropriate models for displacement, tilt, or moisture detection.
- Mounting brackets: For fastening to concrete, wood, or metal.
- Smart hub or gateway: Links sensors to the software network.
- Power supply: Batteries or low-voltage cables.
- Drill and masonry bits: To create attachment points.
- Sealant: To shield holes from water entry.
- Protective gear: Gloves, safety glasses, and knee pads.
Label sensors in advance to streamline subsequent calibration.
Step-by-Step Installation Process
1. Map Sensor Locations
Develop a diagram indicating positions around the perimeter and at critical load points. Position sensors 8 to 10 feet apart along walls or corners. Place at least one moisture sensor near downspouts or drainage-prone zones.
2. Mount the Sensors
Secure each sensor with anchors or adhesives per manufacturer instructions. Maintain level orientation and uniform height relative to the slab or beams. Use a laser level or bubble tool to confirm alignment.
3. Connect to the Hub
Activate sensors and pair them with the hub through the app. Assign identifiers matching the diagram, like north wall or garage corner. Test signal quality before securing positions.
4. Calibrate and Test
Initiate calibration to establish baseline measurements for tilt, displacement, and moisture. Circumnavigate the home while observing live data to confirm sensitivity. The setup should register minor disturbances, such as footsteps or door operations.
5. Seal and Protect
Fill drilled holes with sealant and encase exposed wiring in conduit or covers. For soil-embedded moisture sensors, bury probes correctly and avoid direct sun exposure.
6. Review Initial Data
Operate the system for a minimum of 24 hours prior to analysis. Define normal fluctuation ranges to distinguish routine variations from actual shifts.
Evaluating Data and Responding to Alerts
Systems present information through graphs or heat maps illustrating shift scale and direction. Variations under 1/16 inch often stem from temperature or moisture cycles. Sustained or abrupt changes exceeding 1/8 inch could indicate settling or infiltration; conduct on-site checks for cracks, gaps, or alignment issues in doors and windows.
Corrective Actions
- Drainage improvement: Reroute downspouts, incorporate French drains, or add gutters to limit saturation.
- Soil stabilization: Deploy chemical treatments or piers for ongoing movement.
- Moisture management: Regulate irrigation to sustain even perimeter moisture.
- Structural reinforcement: Engage an engineer for underpinning or jacking if thresholds are breached.
Swift responses to data insights curb damage expansion and uphold property value.
Troubleshooting Common Issues
False Alerts or Noise
Interference from electronics or weak Wi-Fi may yield erroneous data. Relocate the hub or introduce boosters. Update firmware to resolve glitches.
Sensor Drift
Baselines can evolve; recalibrate every 6 to 12 months or post-severe weather. Adhere to battery replacement timelines.
Moisture Sensor Failure
Static outputs suggest corrosion or flooding; inspect housings, replace faulty units, and reseal joints.
Data Loss
App gaps indicate hub power or connection failures. Utilize local backups like SD cards to avoid information voids.
Maintaining Your Monitoring System
Sustained performance requires consistent checks.
- Quarterly: Inspect housings for accumulation, rust, or loosening.
- Biannually: Recalibrate and scan for erosion or new fissures.
- Annually: Analyze trends and book inspections for anomalous patterns.
- Battery replacement: Every 24 to 36 months per guidelines.
Update software routinely for security and enhanced features, including advanced predictive tools.
DIY vs Professional Installation
DIY Viability
Individuals adept with tools and apps can manage wireless systems independently, potentially reducing costs by 20 to 40 percent. Precision in placement and calibration remains essential to avoid inaccuracies.
When to Hire Professionals
Seek experts for homes with prior settlement, varied elevations, automation integrations, or documentation needs. They ensure exact setup and compatibility with elements like pumps or controls. Labor fees range from 500 to 1,200 dollars based on scope.
Choosing a Qualified Contractor
Prioritize those skilled in monitoring or IoT, with valid credentials and certifications. Review portfolios or references attuned to your foundation and soils.
Integrating Smart Sensors with Other Home Systems
IoT ecosystems enable synergy with additional devices.
- Smart irrigation controls: Modify schedules using moisture inputs.
- Sump pumps: Activate on detected water rises.
- HVAC systems: Regulate humidity to ease structural strain.
- Security systems: Leverage vibrations for intrusion alerts.
Such connections elevate monitoring to comprehensive safeguarding.
Long-Term Benefits and Homeowner Confidence
Pro Tips for Success
- Recalibrate fully after intense weather or saturation.
- Update firmware regularly for precision.
- Examine trends beyond alerts alone.
- Pair data with physical checks for full insight.
- Log all interventions for record-keeping.
These practices foster enduring stability and peace of mind.