3D-Printed Foundations Reduce Build Time by 60 Percent in 2025
The foundation serves as the essential base for any building, influencing the overall project timeline and budget. Advances in 3D printing technology now apply to large-scale structures, allowing builders to design, form, and install foundations with unprecedented efficiency. Robotic printing systems shorten installation time by up to 60 percent, lower expenses, and deliver superior accuracy compared to traditional concrete methods. This article details the mechanics of 3D-printed foundations, essential planning considerations, and their impact on residential and commercial projects.
Key Takeaways
- Cost Breakdown: Expect $12 to $18 per square foot, allocated as 55 percent for materials, 30 percent for equipment, and 15 percent for labor.
- Timeline Comparison: Complete a 3D-printed foundation in 3 to 5 days, versus 8 to 14 days for standard pours.
- Accuracy Standards: Achieve tolerances within one-eighth inch using automated layering and digital adjustments.
- Regulatory Needs: Obtain standard permits for concrete foundations, plus records on robotic operations and material tests.
- Selection Criteria: Evaluate soil type, weather patterns, structural loads, and availability of printing equipment.
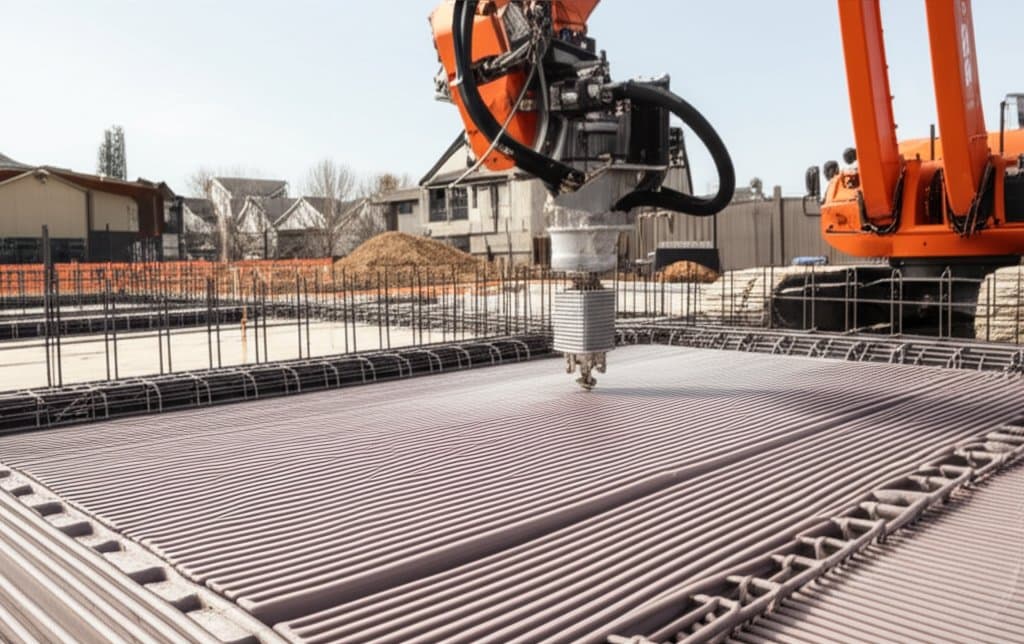
How 3D-Printed Foundation Technology Operates
3D-printed foundations employ computer-guided robotic arms or gantry setups to deposit layers of custom concrete or mortar on-site. These systems follow a digital blueprint generated via Building Information Modeling (BIM) software, replicating exact shapes and measurements. The process bypasses traditional wooden forms, rebar installations, and large crews by building the foundation layer by layer.
Material extrudes in seamless passes, creating chemical and physical bonds as each layer sets. This method produces a single, integrated unit that embeds utility routes, support footings, and connection points during the print. Builders benefit from a streamlined workflow that prioritizes precision and reduces on-site disruptions.
Core Benefits of the Technology
- Rapid Execution: Robots run nonstop, accelerating progress beyond manual limitations.
- **Resource ** Cut waste by up to 40 percent by printing precise volumes only.
- Versatile Designs: Create intricate shapes, arches, and varying depths without custom molds.
- Sustainability Gains: Incorporate recycled materials and lower-cement formulas to decrease environmental impact.
Navigating Planning and Permits
Start any 3D-printed foundation project by reviewing local regulations and permit processes. Authorities generally classify printed concrete like conventional types, but expect to submit details on material formulas, curing processes, and equipment settings. In certain areas, a certified structural engineer must confirm the foundation supports required loads, often 2,500 to 4,000 pounds per square inch for homes.
Engage early with inspectors to align on documentation needs. This preparation avoids delays and ensures compliance from the outset. Focus on verifiable data to build confidence in the innovative approach.
Essential Planning Steps
- Site Evaluation: Test soil stability and water flow to confirm suitability.
- Model Development: Build a comprehensive BIM file outlining reinforcement areas and utility integrations.
- Equipment Positioning: Secure clear access and level ground for the printer's movement system.
- Logistics Coordination: Arrange steady material delivery and reliable power sources for seamless operation.
Site Preparation Essentials
Site readiness for 3D printing mirrors traditional methods yet demands greater exactness in measurements. Follow these steps to create a solid base for the robotic process.
-
Excavation and Grading: Clear topsoil to 18 to 24 inches below finished level. Compact the underlying soil to 95 percent density for even load distribution.
-
Base Layer Installation: Apply 4 to 6 inches of gravel, followed by a plastic vapor barrier to block subsurface moisture.
-
Printer Alignment: Mount rails or gantry tracks to span the full foundation area. Verify alignment on all directions for uniform layer application.
-
Material Testing: Adjust the concrete mix flow to design specs. Optimal consistency prevents sagging or gaps between layers.
The Printing Process in Action
Efficiency shines during the actual printing, as the robot adheres strictly to the digital plan. Monitor progress closely to capitalize on the technology's strengths.
-
Layer-by-Layer Building: Extrude material at 1 to 2 inches per pass. Allow partial hardening between layers to secure strong connections.
-
Embedding Supports: Mix in fibers for reinforcement, or halt briefly to add metal grids, bolts, or pipes as needed.
-
Post-Print Curing: Permit at least 7 days for initial setting. Check for cracks over one-sixteenth inch and test strength using sample cylinders.
This sequence minimizes errors and maximizes the 60 percent time savings.
Ensuring Quality and Resolving Issues
Robotic accuracy reduces risks, but vigilant monitoring remains vital. Address potential problems promptly to uphold structural integrity.
- Layer Adhesion Problems: Stem from pauses in printing; sustain steady rhythms to promote bonding.
- Crack Formation: Arises in dry or breezy weather; apply covers or sprays to preserve hydration.
- Base Shifting: Signals poor compaction; recheck subsoil firmness prior to starting.
Incorporate sensors for ongoing adjustments during the print. These practices ensure a durable outcome.
Ongoing Maintenance Practices
Installed 3D-printed foundations demand little upkeep. Conduct yearly checks for fissures wider than one-eighth inch or shifts over one-half inch across 10 feet. Maintain clear drainage to prevent water accumulation at the edges. Seal small defects with epoxy or specialized grout.
With routine care, these foundations last 80 to 100 years, matching or surpassing poured concrete. Regular inspections preserve performance over decades.
Professional Implementation Options
Large-scale printing requires specialized gear, often costing over $250,000, and skilled operators. Homeowners should collaborate with accredited 3D construction firms to access the technology. Such partnerships deliver 20 to 35 percent savings over labor-intensive alternatives while ensuring expert execution.
Achieving Sustainable Construction Gains
3D-printed foundations have transitioned from prototypes to proven solutions on real-world sites. They streamline timelines, conserve resources, and elevate precision, paving the way for greener building practices. Adopt this method to enhance project outcomes and meet modern efficiency demands.