Recycled Glass Bricks: Pioneering Eco-Masonry
Skill Level: Moderate
Physical Demand: Medium, involving lifting and precise alignment
Helpers Needed: One recommended for handling and positioning larger sections
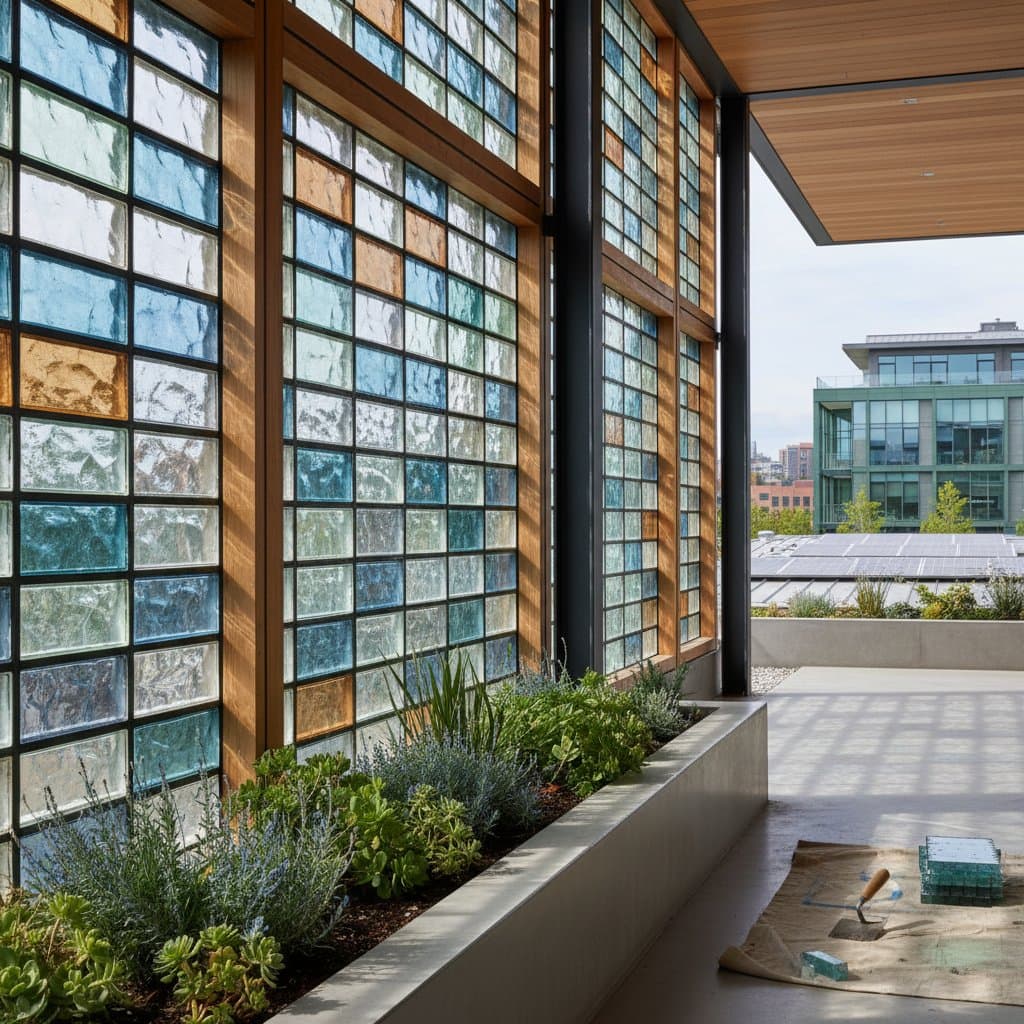
Constructing with recycled glass bricks presents a fulfilling endeavor that integrates visual elegance, environmental stewardship, and technical ingenuity. These translucent blocks introduce natural illumination into interiors and exteriors while repurposing post-consumer glass to divert waste from landfills. Suitable for decorative partitions, landscape accents, or robust structural elements, recycled glass bricks provide a pathway to masonry that balances style and sustainability.
Prior to starting, evaluate your project meticulously. Grasping the distinctions between these bricks and conventional clay or concrete variants proves essential for attaining structural integrity alongside aesthetic refinement. This guide delineates their makeup, potential applications, and assembly procedures, enabling you to determine whether the undertaking suits independent efforts or necessitates expert involvement.
Understanding Recycled Glass Bricks
Recycled glass bricks consist of masonry components fashioned chiefly from recovered glass, which undergoes crushing, purification, and fusion at elevated temperatures. The outcome yields a compact, resilient substance featuring a lustrous finish that scatters light effectively. Distinct from hollow glass blocks, these bricks typically form as solid pieces amenable to cutting or drilling akin to natural stone.
Varieties and Uses
1. Structural Glass Bricks
Engineered to bear loads in walls or columns, these demand exact mortar connections and occasional stainless-steel supports. Applications in load-bearing contexts usually require oversight from a structural engineer and certified installer.
2. Decorative or Accent Bricks
Ideal for garden barriers, room dividers, or ornamental interiors, these suit hands-on builders. They deliver striking visuals without the obligation to withstand substantial weights.
3. Modular Glass Panels
Factory-assembled arrays of fused bricks facilitate expedited setup. Though weightier, these panels minimize misalignment during placement.
Significance in Design
Recycled glass bricks align with green building principles by curtailing landfill contributions and curbing reliance on virgin resources. Their capacity to reflect and propagate light enhances ambient illumination, thereby lessening dependence on electric sources. Furthermore, inherent resistance to dampness and fungal growth ensures enduring performance with minimal upkeep in sustainable projects.
Independent Versus Expert Installation
Non-structural partitions or ornamental landscapes lend themselves to solo execution. However, for bearing walls, foundational integrations, or elements subject to earth forces, engage a qualified mason or engineer. Although robust, glass bricks prove susceptible to fractures from irregular pressures, underscoring the value of professional planning for security.
Planning Your Recycled Glass Brick Project
Site Evaluation
Initiate by inspecting the proposed area for firmness and environmental influences.
- Soil Composition: Firm soils bolster garden walls effectively; loose sands necessitate broader foundations.
- Water Management: Direct runoff away from the base to avert freeze-thaw deterioration.
- Terrain Inclination: For inclines, employ stepped bases or tiered configurations.
- Illumination Patterns: Assess daily light variations, as they alter the bricks' visual impact.
Essential Measurements
Determine the wall's full length and target height, then compute square footage. Divide by the surface area of a single brick to gauge quantity needs. Incorporate a 10 percent allowance for alterations and mishaps. For instance, with bricks spanning 0.1 square feet each, a 20-square-foot surface requires approximately 220 units.
Key Environmental Considerations
Fluctuating temperatures induce expansion; thus, incorporate narrow intervals between bricks for adaptable outdoor joints. Steer clear of zones prone to machinery impacts or shifting ground.
Anticipated Challenges
These bricks carry significant weight and demand cautious manipulation to avoid edge damage from falls. Sectioning requires a diamond-tipped, water-cooled saw, generating slurry that requires containment. Secure ample workspace and electrical outlets in advance.
Selecting Materials
Clear Recycled Glass Bricks
- Visual Effect: Transparent or subtly hued
- Strength: Superior, withstands elemental exposure
- Expense: Elevated compared to concrete alternatives
- Required Expertise: Moderate, emphasizing accurate positioning
- Upkeep: Periodic washing with gentle solutions
- Optimal Applications: Indoor dividers or focal walls
- Design Result: Spectrum-like light scattering
Frosted or Textured Recycled Glass Bricks
- Visual Effect: Scatters light while preserving seclusion
- Strength: Comparable to transparent variants
- Expense: Marginally increased for surface treatments
- Required Expertise: Moderate
- Upkeep: Minimal, conceals marks and streaks
- Optimal Applications: Wet areas or outdoor screens
- Design Result: Gentle radiance without harsh reflections
Colored Recycled Glass Bricks
- Visual Effect: Infused with hues or blended tones
- Strength: Variable uniformity based on color integration
- Expense: Fluctuates, frequently economical versus clear options
- Required Expertise: Straightforward for non-structural roles
- Upkeep: Equivalent to standard glass
- Optimal Applications: Creative installations or boundary features
- Design Result: Dynamic tonal shifts in daylight
Assembling Tools and Supplies
Manual Implements
- Rubber Mallet: Positions bricks without marring surfaces.
- Level and Square: Confirms verticality and straightness.
- Trowel: Distributes mortar uniformly.
- Joint Spacers: Ensures even separations.
Powered Devices
- Wet Tile Saw with Diamond Blade: Produces precise sections; consider rental for occasional use.
- Cordless Drill: Secures supports or enclosures.
- Mixing Drill with Paddle: Achieves smooth mortar consistency.
Rented Gear
- Masonry Mixer: Maintains blend uniformity in extensive works.
- Panel Lifter or Suction Grip: Facilitates safe transport of assembled units.
Supply Inventory
- Recycled glass bricks with 10 percent surplus
- Polymer-enhanced mortar or transparent adhesive
- Reinforcing mesh or steel bars as needed
- Supportive substrate or footing material
- Glass-compatible sealant
Practical Advice: Acquire 10 percent additional mortar and bricks to accommodate discards and trial pieces.
Detailed Assembly Guide
1. Foundation Preparation
Outline the wall's outline and dig to a minimum depth of 6 inches. Layer with tamped gravel for percolation, followed by a 2-inch mortar or concrete slab. Confirm flatness rigorously to forestall future fissures.
2. Initial Layer Placement
Apply a slender mortar coat and position the base row, using spacers for uniform intervals. Employ the mallet for light taps to embed securely. Recheck horizontality and straightness after every two or three units.
3. Progressive Layering
Distribute mortar between levels with the trowel, preserving joint regularity. Promptly remove surplus before solidification. In elevated structures, embed reinforcing mesh at intervals to equalize stresses.
4. Edge Adjustments
Operate the wet saw for custom fits, maintaining coolant flow to inhibit thermal fractures. Don protective eyewear and hand coverings during operations.
5. Joint Completion
Upon partial hardening, smooth the joints with a tool for sealing and aesthetics. Exercise restraint to prevent dislodging units.
6. Surface Treatment
Post-curing, cleanse with a soft agent and coat with a clear protectant against humidity. Adhere to product guidelines for application volume.
Verification Step: Inspect for plumb and level alignment in all planes prior to setting. Light reveals inconsistencies in joints prominently.
Expert Recommendations
- In regions with freezing conditions, select expansion-tolerant mortar formulated for glass.
- Prepare mortar in modest quantities to sustain uniformity and limit excess.
- Clean glass with non-abrasive fabrics to preserve clarity.
Extending the Project's Impact
Refinements for Completion
Incorporate LED or solar-powered illumination behind indoor sections to amplify glow. For exterior walls, embed planting pockets or base edging lights. Border with steel or salvaged timber for polished framing.
Ongoing Upkeep
Inspect annually for joint cracks or surface films, addressing with resealing as required. Clean using vinegar solutions for stubborn residues, avoiding harsh chemicals that etch glass. In coastal areas, rinse periodically to remove salt buildup, ensuring prolonged vibrancy.
Creative Expansions
Pair bricks with native plantings in garden settings to foster biodiversity. Integrate smart sensors for automated lighting that activates at dusk, enhancing energy efficiency. Experiment with mosaic inlays using brick fragments for personalized motifs.
Pitfalls to Sidestep
- Irregular Foundation: Provokes leaning or splits; prioritize absolute evenness at outset.
- Excessive Mortar Application: Results in hazy seams and unstable placement; apply sparingly.
- Hastened Checks: Set mortar resists corrections; validate each layer progressively.
- Omitted Protection: Permits water penetration, leading to discoloration in seams.