Accelerate Foundation Construction by 60% Using 3D Concrete Printing
3D printed concrete foundations revolutionize the initial stages of home and building construction. This innovative technique employs a computer-guided printer to extrude concrete in precise layers, eliminating the need for traditional formwork, rebar installation, and extended curing periods. The outcome is a robust, consistent foundation completed in significantly less time than conventional methods.
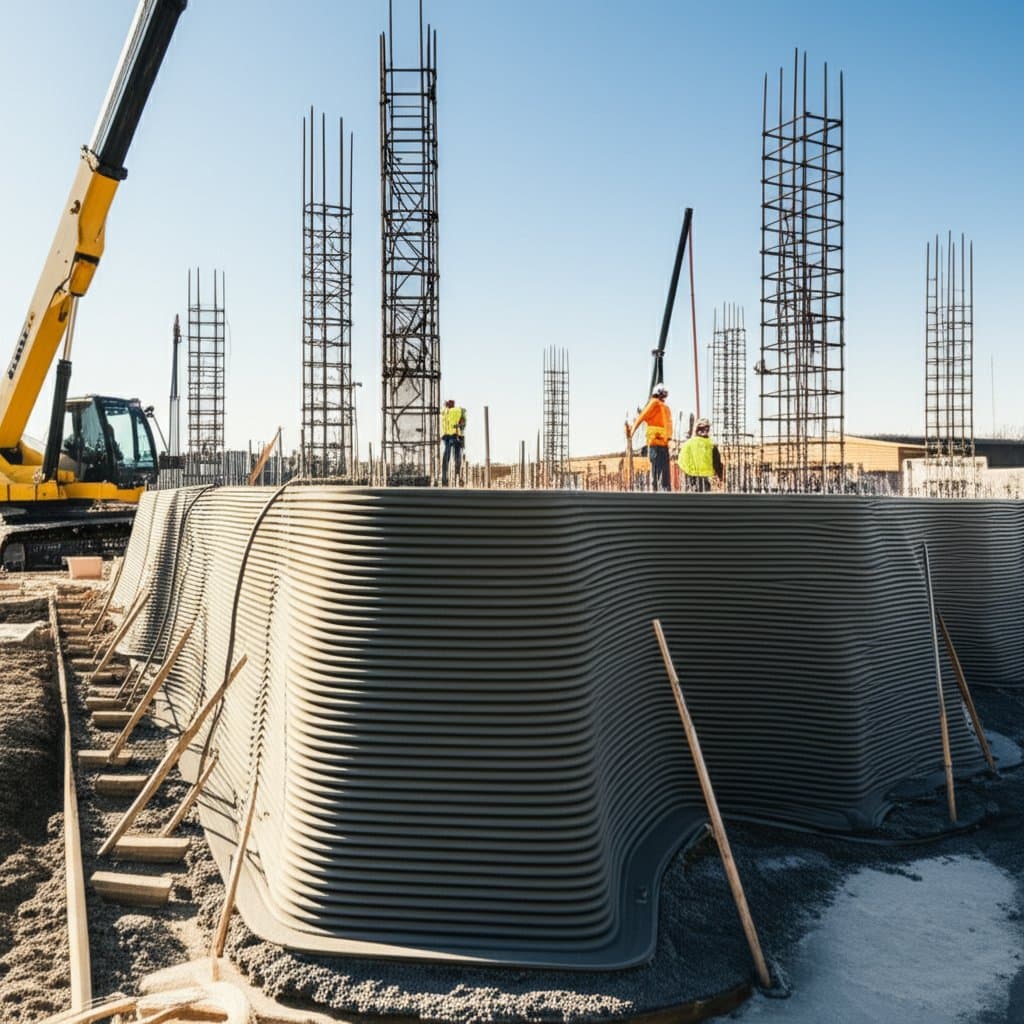
Understanding 3D Concrete Printing
3D concrete printing involves a robotic nozzle that deposits a specialized cement mixture layer upon layer. The system follows a pre-designed digital blueprint to form foundation walls or slabs directly on the construction site. This automation supplants much of the manual labor associated with forming, thereby enhancing material efficiency and structural uniformity.
Advantages and Challenges
Advantages
- Rapid Construction: Completes standard foundations up to 60 percent faster than traditional pouring techniques.
- Uniform Quality: Automation guarantees consistent wall thickness and precise alignment throughout the structure.
- Labor Efficiency: Requires fewer on-site workers after the initial printer setup.
- **Material ** Consumes only necessary amounts of concrete, eliminating excess forms and debris.
- Versatile Designs: Accommodates curved elements or bespoke shapes without incurring additional expenses.
Challenges
- Elevated Initial Investment: Demands costly specialized machinery and skilled personnel for operation.
- Geographic Limitations: Availability remains restricted in certain areas due to emerging infrastructure.
- Mixture Precision: The concrete formulation requires exact consistency to prevent layer deformation.
- Environmental Dependencies: Operations may halt during intense rainfall or extreme temperatures.
- Regulatory Gaps: Local building codes often lack specific provisions for approving printed foundations.
Cost Considerations
The cost of materials for 3D printable concrete typically ranges from 8 to 12 dollars per square foot. Total installed costs for foundations fall between 18 and 30 dollars per square foot, influenced by factors such as wall height, design intricacy, and site accessibility.
Projects in expansive areas or remote sites encounter higher expenses due to logistics and supplier constraints. Conversely, standardized designs and favorable site conditions yield lower costs. The reduction in labor often balances the premium for this advanced technology after calibration.
Durability and Upkeep
Printed foundations exhibit performance comparable to traditional poured concrete when the mixture adheres to established structural criteria. These foundations boast a service life of 75 to 100 years, provided they receive protection against water penetration and ground shifts.
Conduct annual inspections to identify cracks or settling issues. Maintain effective drainage systems and direct downspouts far from the foundation perimeter. Routine cleaning involves rinsing accumulated soil with low-pressure water, while applying a sealant can further safeguard against moisture in regions prone to freeze-thaw cycles.
Key Specifications to Evaluate
Prior to engaging a 3D printing service or procuring supplies, verify the following specifications:
- Compressive Strength: At least 3,000 psi for residential applications, with higher ratings for load-bearing elements.
- Mixture Certification: Compliance with ASTM standards or equivalent for structural integrity.
- Interlayer Adhesion: Testing to confirm strong bonding without weak seams.
- Printer Precision: Tolerances within a few millimeters for accurate placement.
- Reinforcement Integration: Incorporation of fibers or embedded mesh to enhance tensile properties.
- Curing Protocols: Controls for humidity and temperature during and post-printing phases.
Preparation Steps
Preparation for a 3D printed foundation aligns with standard practices but emphasizes greater accuracy:
- Site Survey and Marking: Precisely outline the foundation footprint using the digital model.
- Excavation Work: Excavate to the specified depth and compact the sub-base thoroughly.
- Foundation Bed: Install a layer of crushed stone to facilitate drainage and ensure stability.
- Equipment Access: Prepare firm terrain for printer positioning and secure a reliable power source.
- Water Control: Implement measures to manage surface runoff and avoid erosion during the process.
Printers often operate on rails or tracks, making ground stability essential to avoid deviations.
Installation Process
- Digital Model Loading: Import the 3D design file into the printer's software interface.
- System Calibration: Adjust and level the printer apparatus for optimal alignment.
- Material Preparation: Mix the concrete to achieve the precise viscosity required.
- Layer Deposition: Direct the nozzle to apply layers following the programmed trajectory.
- Reinforcement Placement: Integrate mesh or rebar during designated intervals between layers.
- Curing Phase: Maintain moisture on the surface or cover it for several days to avert fissures.
- Final Touches: Smooth edges, embed anchor bolts, and verify overall levelness prior to erecting the structure.
Foundation Configurations
3D printing supports various foundation forms:
- Perimeter Walls: Ideal for crawl spaces or basement configurations.
- Monolithic Slabs: Suited for slab-on-grade residential structures.
- Ribbed Foundations: Provide rigidity for lighter buildings without excessive weight.
- Custom Profiles: Enable curved or terraced designs for uneven terrain or aesthetic purposes.
Select the configuration according to soil characteristics, frost line depth, and structural loads. Perimeter walls constitute the predominant option for most residential projects.
Professional Involvement
3D concrete printing does not lend itself to do-it-yourself efforts. The equipment, material handling, and digital controls necessitate expert training. Property owners may assist with site readiness, permitting, and drainage setup but must engage a certified 3D concrete specialist for the printing operation.
Post-printing tasks such as finishing, waterproofing, and backfilling offer opportunities for owner participation after curing and official inspections.
Addressing Potential Issues
Layer Delamination: Results from extended delays between layers or inadequate bonding; remedy by grinding affected areas and applying structural grout.
Surface Fissures: Arise from accelerated drying; mitigate by applying moist curing blankets.
Alignment Deviations: Stem from unstable soil or equipment shifts; perform regular calibration checks.
Structural Voids: Occur due to abrupt nozzle velocity changes; repair with high-strength mortar and reassess load-bearing capacity.
Adaptations for Regional Conditions
- Cold Weather Areas: Incorporate air-entraining agents and shield curing surfaces from frost.
- Arid or Hot Climates: Provide shading and use retarders to extend setting times.
- Seaside Locations: Include corrosion-resistant additives for any metallic reinforcements.
- Soils with Expansion Potential: Pair printed walls with deep footings or pilings to manage shifts.
- Wet Environments: Ensure pre-print grading directs water away to prevent undermining.
Comparable Foundation Methods
When 3D printing proves unavailable or uneconomical, evaluate these alternatives:
- Poured Concrete: A standard choice with broad code acceptance, though it demands more time and workforce.
- Insulated Concrete Forms: Integrate thermal barriers with structural elements but involve extensive manual assembly.
- Concrete Block Systems: Effective for minor extensions or retaining walls, yet slower overall.
- Precast Components: Allow quick assembly but require heavy machinery for delivery and placement.
These methods balance speed, effort, and adaptability in distinct ways. 3D printing excels in scenarios prioritizing rapid timelines, precise customization, or reduced manpower.
Strategies for Optimal Results
- Confirm Regulatory Compliance: Consult building authorities at the outset; engineering certifications may be necessary.
- Procure Surplus Materials: Budget for 5 to 10 percent excess to account for trials or minor losses.
- Design Drainage Effectively: Slope the final grade to divert water from the foundation.
- Monitor Printing Progress: Observe for clogs or voids in the nozzle path to enable prompt corrections.
- Record Documentation: Archive digital models and images for compliance records and future reference.
Embracing Efficient Foundations
3D printed concrete foundations represent a reliable advancement in construction technology. With thorough preparation, this method delivers unmatched efficiency and accuracy for contemporary builds.
For upcoming projects or expansions, inquire with regional contractors about 3D printing capabilities. As adoption grows, automated foundations promise to streamline building processes across diverse settings.