- Key decision factors: Site slope, drainage patterns, local climate, and selected plant varieties influence the overall design feasibility and long-term durability of tiered masonry planters.
Understanding Tiered Masonry Planters
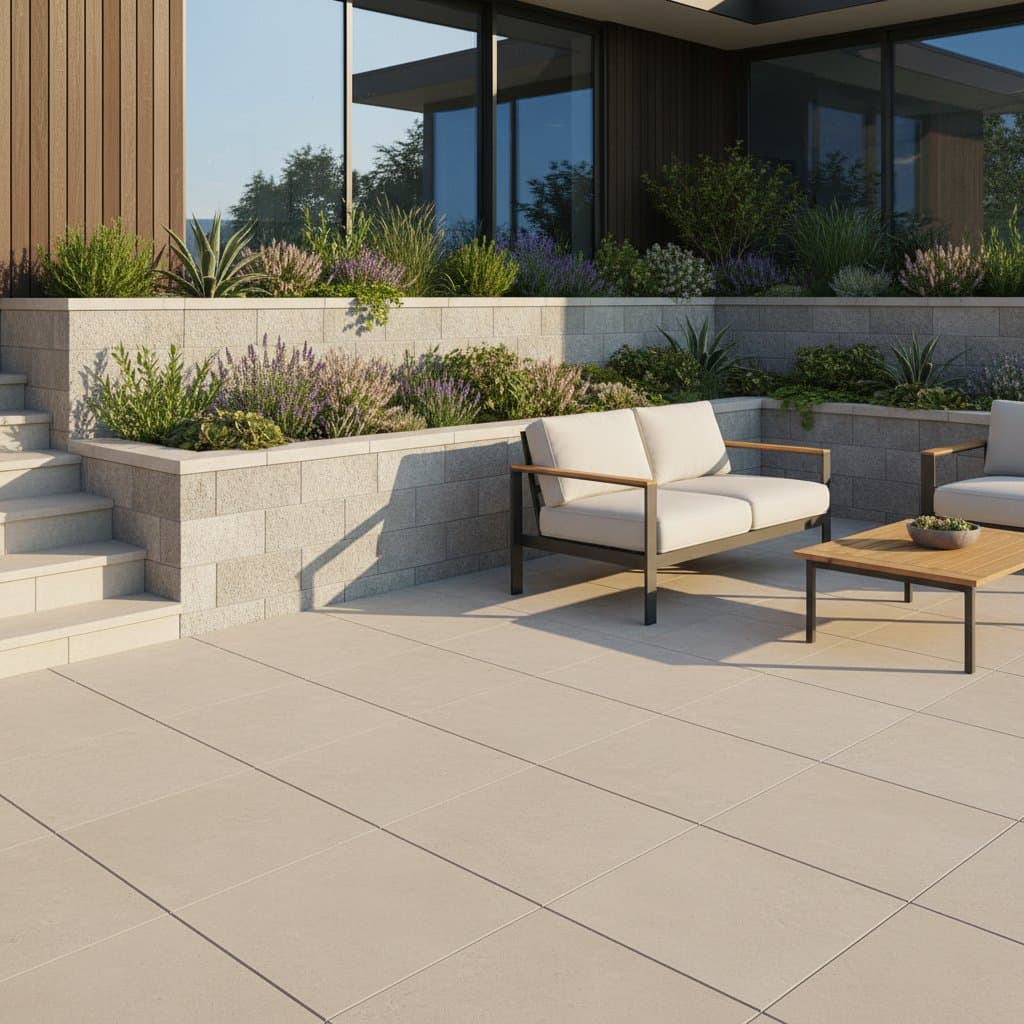
Tiered masonry planters feature multiple elevated levels that organize planting spaces vertically. These structures either adapt to the natural slope of an existing patio or introduce deliberate height variations through sturdy masonry walls. Such designs facilitate effective water distribution, minimize soil erosion, and add a sense of architectural flow to otherwise level outdoor areas.
Design Benefits
- Enhanced visual depth: Varied heights introduce perspective, making compact patios feel more expansive and inviting.
- Specialized planting areas: Upper tiers suit lightweight plants like herbs, while lower levels accommodate denser options such as shrubs or perennials.
- Superior water management: Natural gravity directs excess moisture downward, avoiding accumulation on patio surfaces.
- Long-term resilience: Masonry construction endures harsh weather exposure with little ongoing maintenance required.
Planning Your Project
Evaluate site specifics, intended configuration, and applicable local guidelines prior to commencing any work.
Permits and Regulations
Certain areas mandate permits for masonry walls exceeding 24 inches in height. Verify compliance with building codes and required setbacks to avoid penalties or mandatory rework.
Material and Design Choices
Select materials that harmonize with your home's facade for cohesive aesthetics. Consider these alternatives:
- Concrete blocks: Affordable and straightforward to assemble without specialized tools.
- Natural stone: Delivers an organic, textured look, though it demands expert placement for stability.
- Brick: Aligns well with classic styles, offering sharp edges and uniform patterns.
Pair these with plants adapted to your region's conditions and light levels. Succulents excel in arid, sunny spots, whereas ferns flourish in cooler, shaded tiers.
Estimating Costs and Timeline
A modest patio upgrade incorporating tiered planters ranges from $1,800 to $4,500, varying by material and intricacy. Those undertaking the project themselves reduce expenses by approximately 40 percent through eliminated labor fees, yet they allocate additional time for meticulous planning and execution. Allocate 3 to 5 days for the full process, accounting for mortar curing periods.
Preparing the Site
Thorough site readiness forms the foundation for a secure and enduring installation.
-
Evaluate slope and drainage: Trace water movement across the patio area. Establish a gentle incline of 1 inch every 4 feet, directing flow away from the house foundation.
-
Outline the layout: Employ spray paint or taut string lines to delineate each tier's position. Double-check dimensions prior to digging.
-
Excavate and prepare the base: Remove soil to a depth of 6 to 8 inches below the surface for every wall foundation. Firmly compact the subsoil, then layer in 4 inches of gravel to support drainage and load-bearing capacity.
-
Account for frost line: In regions with freezing temperatures, extend excavations below the local frost depth to avert structural shifts from seasonal thawing and freezing.
Constructing the Masonry Planters
Execute these steps methodically to yield robust, aligned, and visually appealing tiers.
-
Install the base layer: Position the initial row of blocks or stones atop the prepared gravel bed. Verify flatness with a spirit level and adjust using a rubber mallet. Precision here sets the standard for upper courses.
-
Build upward layers: Offset joints between rows to enhance structural integrity, and spread mortar uniformly. For retaining configurations, incorporate a 1-inch batter per vertical foot to promote stability.
-
Incorporate drainage features: Embed perforated piping along the rear base, surrounded by gravel, to channel water efficiently from the structure.
-
Backfill progressively: Introduce gravel or coarse sand behind each completed course, compacting in layers to minimize future subsidence.
-
Seal interior faces: Coat the inner surfaces with a penetrating masonry sealer or membrane to block moisture penetration and reduce cracking risks.
-
Apply capstones: Secure flat stones or tiles along the uppermost edges to shield joints from weathering and impart a refined finish.
Ensuring Quality and Addressing Challenges
Conduct regular checks during and after construction to uphold standards. Inspect each course for level alignment and plumb verticality using appropriate tools. Upon completion, test drainage by simulating rainfall to confirm unobstructed flow.
Resolving Common Problems
- Wall protrusion: Typically results from insufficient drainage or loose backfill. Disassemble upper sections, reinforce the drainage layer, and reconstruct with tighter compaction.
- Mortar fractures: Arise from rushed curing or base settling. Repair by grinding out damaged areas and applying new mortar to affected seams.
- Moisture accumulation: Correct by refining the site's gradient or augmenting gravel depth to accelerate runoff.
Sustaining Your Tiered Planters
Preserve the installation's integrity through routine care practices.
- Yearly evaluations: Examine for fissures exceeding 1/8 inch, displaced capstones, or deteriorating mortar.
- Periodic maintenance: Clear accumulated leaves or sediment from drainage outlets and weep holes.
- Protective recoating: Refresh the sealer application every 3 to 5 years to limit water ingress.
- Vegetation control: Prune plants regularly to curb root growth that could compromise joint integrity.
Choosing Between DIY and Professional Help
Individuals possessing basic masonry knowledge and ample time find DIY approaches feasible, potentially cutting labor costs by 40 percent. However, errors in leveling or water management invite significant repairs. Engage certified professionals for elaborate multi-tier setups or hefty stone elements to guarantee safety and precision.
Expert Recommendations for Optimal Results
Initiate work in temperate conditions to support even mortar setting. Prepare mortar mixtures in limited quantities to preserve workability. Employ a chisel for clean block adjustments instead of undue force on mismatched pieces. Line backfill zones with geotextile fabric to inhibit soil intrusion. Integrate subtle pathway lighting within the tiers to accentuate material textures after dark.
Integrating tiered masonry planters redefines patio functionality, merging robust form with living greenery for an outdoor retreat that withstands time and enhances daily enjoyment.