Overview of Recycled Glass Bricks
Recycled glass bricks represent an innovative approach to constructing durable walls and facades. These materials deliver reduced carbon emissions, superior compressive strength, and unique light-diffusing properties that enhance interior spaces. Key factors influencing project costs include raw material processing, energy-intensive firing in kilns, and specialized safety protocols during on-site handling. Potential challenges center on achieving reliable moisture resistance, ensuring joint integrity, and withstanding prolonged exposure to environmental elements.
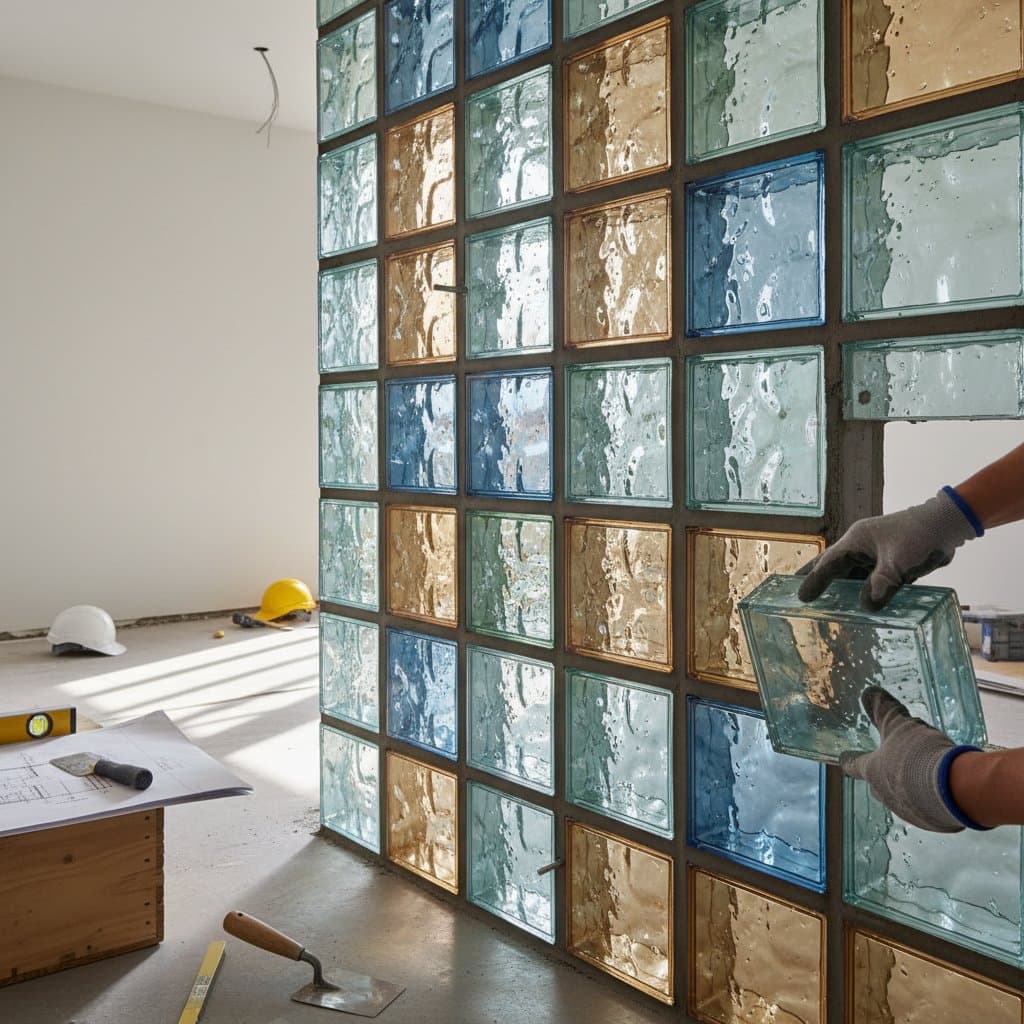
Initial Quality Assessments
Before advancing with a recycled glass brick installation, conduct thorough preliminary evaluations. Rely on visual inspection and manual testing to identify potential issues early.
- Examine sample bricks for even coloration, uniform dimensions, and no visible air pockets within the material.
- Inspect surfaces for fine-line crazing or minor edge fractures, which may worsen during repeated freeze-thaw exposure.
- Gently tap two bricks together; a clear, resonant tone indicates solid density, while a muffled sound suggests hidden internal defects.
- Request supplier-provided documentation on compressive strength values and water absorption percentages.
- Place several test pieces in an outdoor setting for seven days and monitor for any development of surface residue, moisture buildup, or optical clarity degradation.
Such evaluations provide insight into manufacturing standards and long-term surface resilience, informing decisions on bulk procurement.
Critical Warning Indicators
Certain characteristics signal underlying production or material shortcomings that could lead to future complications.
- Rough or inadequately ground edges and sharp protrusions that heighten risks of injury during transportation and assembly.
- Variations in hue across production batches, typically arising from inconsistent sourcing of recycled glass feedstock.
- Excessive water absorption exceeding one percent of the brick's weight, indicating inadequate fusion during the melting process.
- Mortar joints that soften or discolor rapidly upon contact with water, pointing to compatibility issues.
- Absence of verifiable testing reports or independent certification from accredited laboratories.
- Claims of zero-maintenance requirements without supporting evidence from real-world installations.
Addressing these indicators promptly avoids escalating expenses related to corrective actions or premature substitutions.
Remediation Options and Estimated Expenses
Responses to identified defects vary based on the extent of the problem and site accessibility.
- Minor surface imperfections like chips or abrasions: Professional grinding and polishing restores the original appearance, costing approximately eight to fifteen dollars per square foot.
- Color inconsistencies or persistent haze: Complete replacement of impacted sections proves most effective, with total expenses ranging from forty to seventy dollars per square foot, encompassing demolition and reinstallation.
- Water penetration issues: Application of specialized repointing mortar compatible with glass, combined with joint resealing, incurs costs of ten to twenty dollars per linear foot.
- Cracks affecting structural elements: Reconstructing the entire affected area may total one hundred to one hundred fifty dollars per square foot, influenced by required scaffolding and labor intensity.
To mitigate unforeseen financial increases, insist on pre-production sample assemblies and prototypes. Inferior sealants or experimental mortar formulations frequently mask rather than resolve pathways for water ingress.
Deciding Between Repair and Replacement
For the bricks themselves: Opt for repair in cases of superficial or aesthetic damage only. Proceed to full replacement if evidence shows internal separation, recurrent fracturing, or compromised adhesion at interfaces.
For mortar applications: Repoint joints solely upon confirmation of visible bond deterioration. Replace broader sections when efflorescence affects more than twenty percent of the exposed area.
For supporting frames and anchors: Retain existing stainless steel or galvanized components if corrosion remains superficial. Upgrade to corrosion-resistant coated steel or composite alternatives when rust-induced expansion threatens stability.
In general, repair efforts cost about half as much as comprehensive replacement. Reserve replacement for situations where safety or load-bearing capacity faces direct compromise.
Assembling the Right Team and Workflow
Engage a compact group of seasoned professionals from the project's outset to align expertise with execution.
- Architect or envelope specialist: Evaluates overall configuration, joint dimensions, and integrated drainage features.
- Structural engineer: Validates force distribution and seismic bracing for assembled panels.
- Glass masonry specialist: Selects appropriate mortar types and oversees the curing timeline.
- Manufacturer representative: Guides on-site cutting procedures, safe manipulation, and ambient condition monitoring during placement.
Concurrent reviews of design and capabilities minimize discrepancies between plans and practical implementation. Professional oversight typically increases labor expenses by ten to twenty percent, yet it curtails delays, material waste, and liability disputes. Establish robust channels for dialogue between designers and installers, particularly during the curing phase, as fluctuations in temperature can induce edge fractures.
Project Focus Areas
In projects incorporating recycled glass bricks, emphasize functional performance over visual flair to ensure reliability.
- Implement effective water management through precisely installed flashing and dedicated weep systems.
- Integrate robust drainage and airflow mechanisms on the panel's rear side.
- Coordinate electrical conduits and insulation placement to avoid enclosing moisture against the glass surfaces.
- Postpone aesthetic enhancements, such as integrated illumination or patterned embeds, until waterproofing integrity receives confirmation via testing.
Pursue high-value functional improvements while forgoing low-yield customizations, including intricate motifs that disrupt uniform joint alignment or bespoke colorations necessitating isolated production runs. Standard-sized units facilitate economical pricing and expedited delivery schedules.
Budgeting and Installation Sequence
The progression of tasks significantly influences efficiency and final outcomes. Follow this structured approach to minimize revisions and preserve material integrity.
- Verify the underlying framework's alignment and capacity to support loads.
- Position flashing membranes and drainage layers prior to introducing any glass components.
- Construct and approve test panels, confirming aspects like pigmentation, joint uniformity, and tactile finish.
- Lay the initial row ensuring precise horizontal and vertical orientation.
- Erect subsequent layers under controlled environmental conditions to promote even curing.
- Apply sealants exclusively after complete hardening of the assembly.
- Perform final cleansing using a neutral pH solution at low pressure, avoiding acidic agents.
Premature curing acceleration or sealant application invites moisture retention, which may etch glass faces or undermine mortar cohesion. A methodical timeline safeguards both visual appeal and operational soundness.
Ongoing Preservation Strategies
After completion, sustain the installation through routine, uncomplicated upkeep practices.
- Conduct seasonal examinations of joints for emerging fissures or sealant degradation.
- Ensure drainage openings remain unobstructed by accumulated particulates.
- Clean surfaces employing gentle water pressure and non-abrasive brushes.
- Address individual brick impairments without delay to avert load redistribution to neighboring elements.
- Maintain a photographic and descriptive log of interventions for potential warranty claims.
Regular attention to these elements preserves system performance and limits progressive deterioration. Vigilant moisture oversight serves as the primary safeguard.
Enduring Advantages
Utilizing recycled glass bricks contributes to waste diversion from landfills and conservation of virgin resources. One square foot of installed brickage repurposes multiple pounds of post-consumer glass. Their extended service life translates to infrequent interventions. Excellent light reflectivity diminishes reliance on artificial sources in adjacent interiors. Moderate thermal mass aids in moderating temperature variations, especially when combined with suitable insulating barriers.
Initial investments exceed traditional clay or concrete alternatives by twenty to forty percent per square foot. However, extended durability, minimal upkeep demands, and versatile design applications yield substantial returns, particularly in prominent or frequented locations.
Finalizing Your Recycled Glass Brick Project
To validate suitability, construct a two-by-two-foot prototype and expose it to outdoor conditions for one month. Monitor responses to humidity, thermal shifts, and wear indicators, noting any shifts in appearance or integrity.
Success with recycled glass masonry stems from meticulous preparation and rigorous adherence to protocols. Proper handling of hydrology, structural demands, and procedural timelines enables these materials to endure for generations while advancing circular economy principles.