Introduction to Solar Pavers
Solar pavers combine the functionality of traditional paving stones with integrated solar technology. Each unit features photovoltaic cells that absorb sunlight and rechargeable batteries that power built-in LED lights. This design eliminates the need for wiring or external power sources, making installation simpler and reducing long-term expenses.
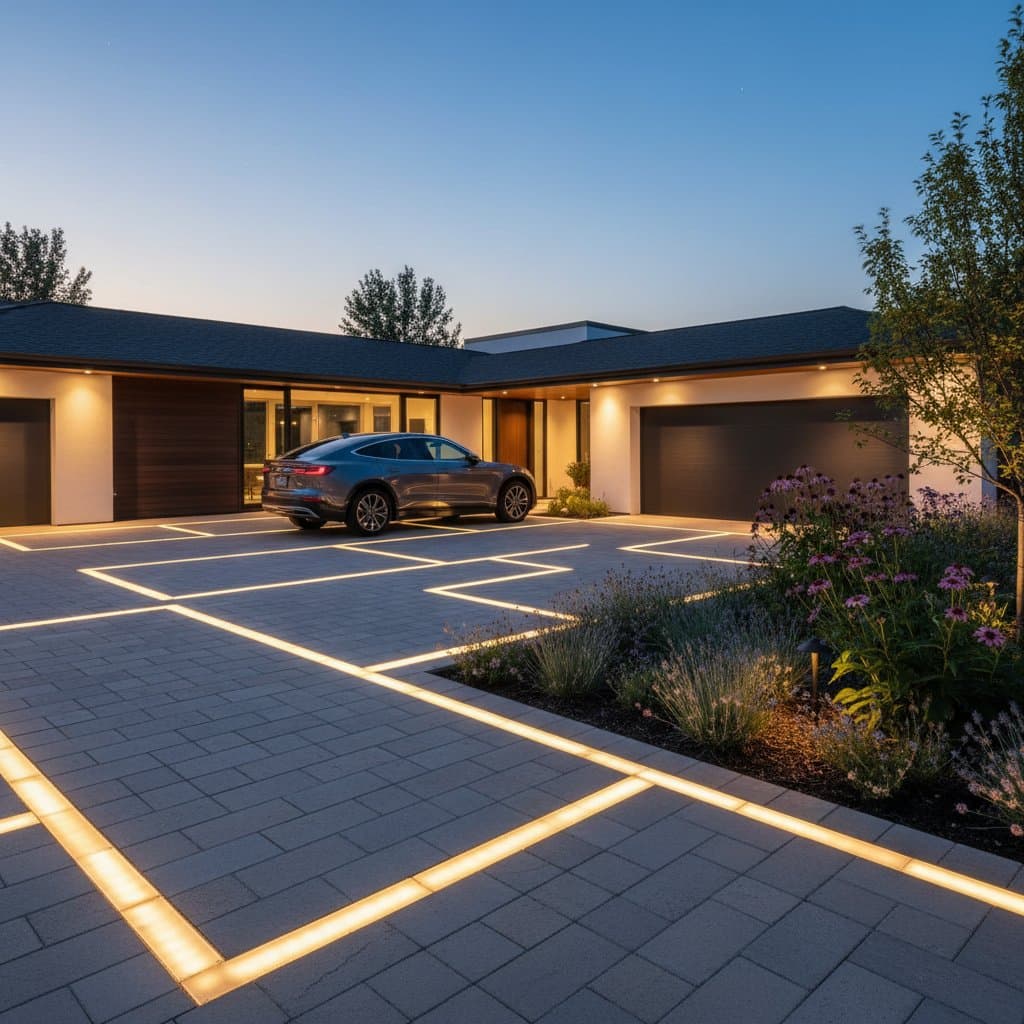
Homeowners choose solar pavers for their ability to enhance safety by illuminating pathways and driveways during evening hours. The lights activate automatically at dusk, deterring accidents and improving visibility for vehicles and pedestrians. Beyond practicality, these pavers add a modern aesthetic to landscapes, available in various sizes, colors, and patterns to complement any home exterior.
Before starting a project, consider factors such as sunlight exposure, traffic volume, and local climate. Areas with at least six hours of direct sun daily perform best. With proper selection and setup, solar pavers deliver years of reliable service while promoting energy independence.
Navigating Permits and Building Codes
Local regulations vary, so research requirements early in the planning phase. Some areas treat solar pavers as low-voltage lighting and mandate permits, especially if the system interfaces with home electrical setups. Contact your municipal building department to confirm rules on outdoor illumination intensity and renewable energy installations.
Compliance ensures safety and avoids fines. For instance, codes often limit light output to prevent glare for neighbors. Document your project details, including product specifications, to streamline the approval process. Professional installers can assist with code adherence if you opt for hired help.
Planning Materials and Costs
Thorough preparation minimizes surprises during installation. Select materials suited to your climate and usage needs for optimal results.
Essential Materials
- Solar pavers: Opt for high-quality options constructed from tempered glass, concrete composites, or recycled plastics. Look for units with IP65 or higher water resistance ratings to withstand rain and snow.
- Base material: Use 4 to 6 inches of crushed gravel or decomposed granite to create a stable foundation that promotes drainage.
- Jointing sand: Polymeric varieties fill gaps effectively, resisting erosion and inhibiting weed penetration.
- Edging restraints: Install plastic, metal, or concrete borders to secure the perimeter and prevent shifting over time.
Cost Breakdown
Budget allocation helps manage expenses. Expect the following distribution for a standard 200-square-foot driveway project:
- Materials: Approximately 60 percent, covering pavers at $15 to $30 per unit, plus gravel, sand, and edging.
- Labor: Around 30 percent, including site excavation, base preparation, and paver placement by skilled workers.
- Equipment rental: About 10 percent for tools like plate compactors, wet saws, and levels.
Total costs range from $2,000 to $5,000, depending on paver quality and project scale. Factor in potential savings from DIY efforts or bulk material purchases.
Preparing the Site
A well-prepared base is crucial for longevity and even lighting performance. Begin by assessing the area for utilities, roots, or obstacles that could interfere.
- Excavate the area: Dig to 7 to 9 inches deep across the entire surface. Remove sod, debris, and old pavement to expose firm soil.
- Install the base layer: Spread and compact gravel in 2-inch lifts using a plate compactor. Aim for a slight slope of 1/8 inch per foot to direct water away from structures.
- Add the leveling course: Distribute 1 inch of coarse sand or stone dust, then screed it flat with a 2x4 board. Protect this layer from foot traffic until pavers are laid.
Verify levelness with a string line or laser level. Proper drainage prevents pooling, which could damage solar components.
Installing Solar Pavers Step by Step
Follow a methodical approach to achieve a professional finish. Work on a dry day for best adhesion of joint materials.
- Lay the pavers: Begin at a straight edge, such as against a garage wall or curb. Place units in your chosen pattern, maintaining 1/8-inch joints. Position illuminated pavers to maximize coverage without clustering lights excessively.
- Connect components: For wired modular systems, link low-voltage cables per manufacturer instructions, burying them 6 inches deep in conduit. Integrated models require no connections; simply ensure cells face upward.
- Compact the surface: Pass a plate compactor over the pavers two to three times, using a protective mat to avoid scratching surfaces.
- Fill and seal joints: Sweep polymeric sand into gaps, then compact again. Lightly mist the area to activate the binder, allowing 24 hours to cure.
- Test the system: Expose pavers to sunlight for a full day. At night, confirm all lights activate uniformly and maintain brightness for 8 to 12 hours.
Adjust as necessary, such as repositioning for better solar access.
Ensuring Quality and Testing Performance
After installation, conduct thorough checks to identify issues early. Walk the surface to detect any high spots or voids.
Use a 10-foot straightedge to measure for deviations exceeding 1/4 inch, which could lead to tripping hazards. Test lighting by simulating dusk with a cover; each paver should illuminate within 30 seconds. Monitor battery charge by observing light duration over several nights.
If inconsistencies appear, reseat loose units or clean obstructed solar panels. This phase confirms the driveway meets safety and aesthetic standards before regular use.
Addressing Common Problems
Even robust installations encounter challenges. Prompt fixes preserve functionality.
- Dim or inconsistent lighting: Wipe solar surfaces with a microfiber cloth and mild soap to remove pollen or dust. Relocate shaded pavers to sunnier spots.
- Water damage: Inspect seals around edges and lights; apply silicone sealant if cracks form. Replace affected units promptly.
- Battery degradation: Monitor runtime annually; swap out lithium-ion batteries every 3 to 5 years as capacity fades.
- Paver movement: Add more edging or recompact the base layer if freeze-thaw cycles cause settling.
Keep a log of observations to track patterns and plan preventive measures.
Ongoing Maintenance Practices
Consistent upkeep keeps solar pavers performing like new. Dedicate time quarterly to routine tasks.
- Sweep debris and wash with a hose and non-abrasive cleaner every 2 to 3 months.
- Examine connections and seals yearly, tightening or resealing as needed.
- Refresh joint sand every 3 to 5 years to combat erosion.
- Evaluate light output seasonally; replace underperforming batteries to sustain brightness.
In harsh climates, cover pavers during extreme weather. With diligent care, expect 10 to 20 years of service from premium models.
DIY Installation Versus Hiring Professionals
DIY suits handy homeowners with basic tools and experience. It saves on labor costs but demands precision to avoid rework. Start small, perhaps with a pathway, to build confidence.
Professionals bring expertise in site assessment, code compliance, and efficient execution. They handle large areas quickly and offer warranties. Weigh your skill level, project size, and budget; for complex designs, expert help ensures superior results.
Expert Recommendations for Optimal Results
Maximize efficiency with these strategies.
- Align solar cells southward to capture peak sunlight.
- Select sites free from overhanging branches or buildings that block rays.
- Incorporate motion-activated features to conserve energy and enhance security.
- Pair with app-controlled systems for remote monitoring and customized lighting schedules.
These enhancements elevate both practicality and visual appeal.
Realizing Long-Term Benefits
Solar pavers transform driveways into efficient, low-maintenance assets. They reduce energy consumption, lower utility bills, and increase property value through improved curb appeal. Safer navigation at night minimizes risks, while the eco-friendly design aligns with sustainable living goals.
Investing in this technology yields dividends in convenience and cost savings. Regular assessments ensure continued performance, making your outdoor space a standout feature for years ahead.