Understanding IoT Sensors for Foundation Monitoring
IoT sensors transform foundation protection for property owners, builders, and engineers. Foundations experience minor movements over time due to soil shifts, moisture changes, and varying loads. Unmonitored shifts lead to cracks, sticking doors, and alignment issues. These sensors detect subtle changes early, well before damage becomes visible.
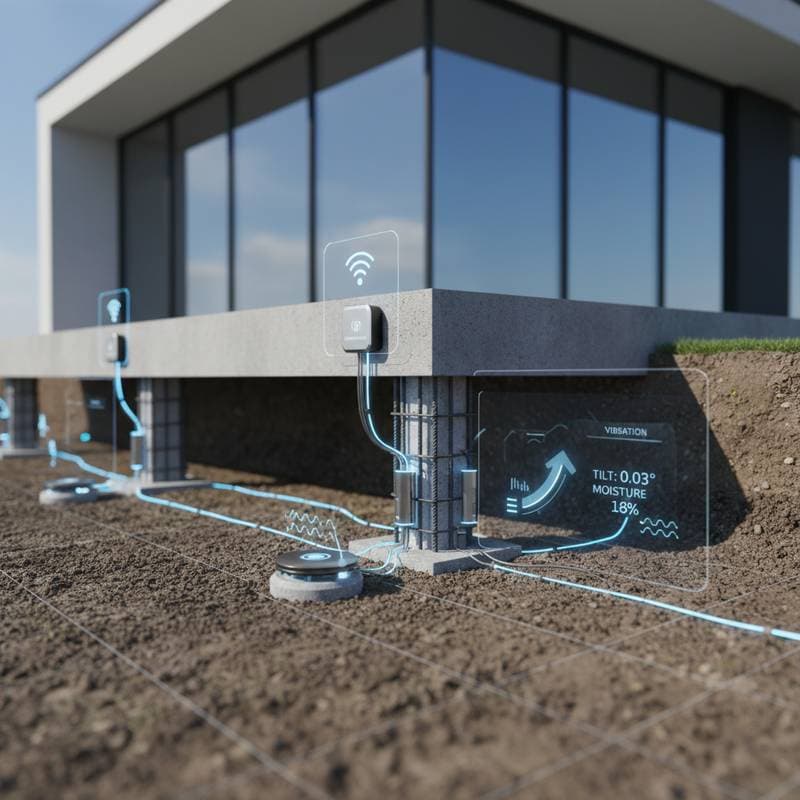
Traditional monitoring relied on visual checks or infrequent surveys, often overlooking initial signs. IoT sensors provide continuous data collection and transmission to a central platform for analysis. They track tilt, vibration, temperature, and moisture in real time. Alerts trigger when values exceed safe limits, allowing intervention to prevent further issues.
This approach shifts from reactive repairs to predictive prevention. Property owners avoid unexpected costs, while contractors improve quality control and warranty compliance. The result extends building longevity and reduces overall expenses.
Skill Level and Safety Considerations
Installation requires intermediate skills, including basic wiring, drilling, and device setup. Follow electrical codes and manufacturer instructions to maintain safety. Avoid drilling into load-bearing concrete or walls without expert consultation. Engage a qualified engineer for projects involving structural changes, excavation, or water systems.
Expect moderate physical effort, such as crawling or reaching into confined areas. Work with a partner to facilitate placement and calibration. Use protective gloves, safety glasses, and a respirator in dusty environments like crawlspaces.
Why Proactive Foundation Monitoring Matters
A foundation bears all structural loads. Uneven shifts cause cracks, framing distortions, and interior displacements. Early detection enables minor fixes, like enhanced drainage or soil reinforcement, rather than costly underpinning.
IoT sensors deliver value through three mechanisms:
- Continuous Observation: They capture movements invisible to the human eye.
- Data-Driven Insight: Algorithms reveal patterns beyond single events.
- Predictive Maintenance: Alerts prompt action to avert failure.
Such systems prove essential in areas with expansive clays, irregular rainfall, or freeze-thaw cycles. They also benefit new builds prone to initial settling.
Deciding Between DIY and Professional Installation
Handle a basic sensor network yourself for monitoring purposes, excluding structural fixes. A standard setup features tilt sensors, humidity detectors, and a gateway hub. Secure them to foundation walls and link to your home network.
Seek professional assistance if:
- The site shows past significant movement.
- Integration targets load-bearing elements or deep footings.
- Work includes excavation, underpinning, or piling.
- Data supports engineering assessments or certifications.
Structural engineers ensure optimal placement and calibration for dependable results.
Planning Your Foundation Monitoring Project
Thorough planning minimizes errors and false alerts. Focus on building a network that accurately captures foundation dynamics.
Site Assessment
Evaluate key elements:
- Soil Type: Clays expand and shrink; sands drain quickly but offer poor cohesion; loams balance stability. Adjust sensor intervals to soil behavior.
- Drainage Patterns: Note water pooling near the base.
- Site Slope: Minor inclines alter water flow.
- Access Challenges: Consider crawlspace height, basement entry, or landscaping barriers.
Essential Measurements
Record the foundation's perimeter, wall heights, and crawlspace dimensions. For slab foundations, target corners and mid-spans. Basements require interior and exterior coverage. Space sensors 10 to 15 feet apart for uniformity.
Environmental Influences
Account for temperature and humidity impacts on precision. Select climate-rated models. In cold areas, position above the frost line or in controlled spaces. Shield exterior units from direct sunlight to avoid heat-induced errors.
Anticipated Challenges
Prepare for weak Wi-Fi, limited outlets, or metal interference. Deploy repeaters or wired options as needed. Steer clear of rebar or tension cables during drilling to preserve integrity.
Selecting Sensor Types
Foundation systems combine specialized sensors, each with unique capabilities.
Tilt and Inclination Sensors
These detect angular deviations in walls or slabs.
Advantages: Sensitive to gradual settling.
Limitations: Need firm mounts; prone to vibration drift.
Price Range: Moderate to high for accuracy levels.
Installation Skill: Intermediate.
Upkeep: Annual calibration.
Ideal Application: Tracking wall or pier positions.
Visual Impact: Concealed in hidden areas post-installation.
Moisture and Humidity Sensors
These monitor soil and ambient moisture levels.
Advantages: Spot drainage or leaks early.
Limitations: Affected by temperature; require periodic adjustment.
Price Range: Low.
Installation Skill: Beginner.
Upkeep: Yearly battery swaps.
Ideal Application: Identifying moisture-driven soil shifts.
Visual Impact: Small and tuckable behind finishes.
Vibration and Strain Sensors
These gauge stress and minor vibrations in elements.
Advantages: Suited for traffic-adjacent or large-scale sites.
Limitations: Demand expert setup; yield intricate data.
Price Range: High.
Installation Skill: Advanced or pro.
Upkeep: Yearly checks.
Ideal Application: Commercial or premium homes.
Visual Impact: Hidden in structural voids.
Tools and Materials Needed
Hand Tools
- Tape measure for precise spacing.
- Level to align mounts.
- Screwdriver set for secure attachments.
- Utility knife for cable and pad prep.
Power Tools
- Drill with masonry bits for anchors.
- Cordless driver for efficiency.
- Shop vacuum for dust removal.
Rental Options
- Moisture meter for initial soil checks.
- Infrared thermometer for thermal assessments.
Supplies Checklist
- Chosen sensors, plus 10 percent extras.
- Brackets or adhesive mounts.
- Wiring or gateways.
- Power sources and batteries.
- Enclosures for outdoor use.
- Clips and conduit for organization.
Installation Steps
Step 1: Capture Baseline Data
Document existing measurements, crack sizes, and level differences. This reference tracks changes over time. Omitting this step hinders progress evaluation.
Step 2: Design Sensor Positions
Sketch the layout, placing units at corners and along walls. Maintain uniform heights from the base. Even distribution reflects true stability.
Step 3: Surface Preparation
Remove debris from mount sites. Clean concrete with alcohol or detergent, then dry fully. Clean bonds enhance reliability.
Step 4: Secure Sensors
Align per guidelines using masonry-rated fasteners. Level each before locking in place. Misalignment skews data.
Step 5: Link Power and Connectivity
Power up units and connect via Wi-Fi or cable to the hub. Test signal quality in the app.
Step 6: Perform Calibration
Execute the manual's routine under steady conditions, post-weather events. This sets the movement reference.
Step 7: Confirm Transmission
Ensure dashboard receipt with correct units and times. Troubleshoot non-reporting devices.
Step 8: Establish Monitoring Routine
Examine data weekly for patterns. Normal micro-shifts occur, but persistent trends signal issues. Address via drainage tweaks or expert input if thresholds breach.
Practical Advice: Acquire 10 percent surplus sensors for future needs.
Installation Quality Checks
Verify throughout:
- Level and secure attachments.
- Protected, dry wiring.
- Stable readings after 24 hours.
- Calibrations aligning to baselines.
Recalibrate or reposition drifting units.
Sustaining System Performance
Post-Installation Refinements
Label zones clearly. Route and shield cables. Archive records and manuals accessibly.
Ongoing Maintenance
Quarterly inspections for buildup, rust, or power issues. Update after network alterations. Recalibrate yearly.
System Expansions
Pair with:
-
Smart irrigation for moisture control.
-
Weather integrations for environmental correlations.
-
Apps for advanced modeling.
-
Mobile alerts for threshold breaches.
These features create an adaptive safeguard.
Pitfalls and Prevention
Avoid:
-
Uncalibrated setups yielding errors.
-
Uneven mounts causing distortions.
-
Overlooked moisture patterns.
-
Excessive fastening damaging units.
-
Unsecured networks risking disruptions.
Remedy with adjustments, relocations, or boosters.
Resolving Problems
For erratic data:
-
Inspect power and batteries.
-
Test connectivity.
-
Restart the hub.
-
Check for damage.
Halt logging during fixes. Consult engineers for severe settling indications.
Realizing Lasting Stability Gains
IoT monitoring delivers enduring advantages: minimized repairs, prolonged structure life, and confident ownership. Proactive insights empower timely actions, transforming potential vulnerabilities into managed assets. Invest in this setup to secure your property's foundation for years ahead.