Key Measurements to Record
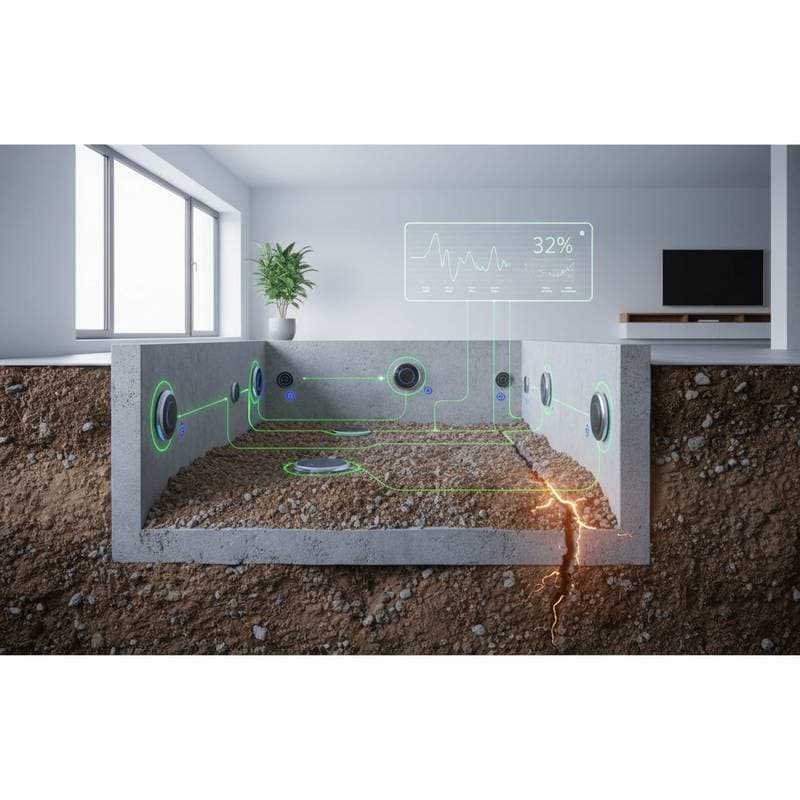
Determine the foundation's perimeter length and pinpoint zones for sensor deployment. Sensors generally cover a radius of several feet, so distribute them uniformly along weight-bearing edges. Capture initial moisture levels at corners and beneath load-heavy walls. These baseline figures provide references for evaluating subsequent data trends.
Environmental Factors to Evaluate
- Climate: Areas with high humidity necessitate additional moisture sensors.
- Drainage: Inadequate drainage hastens uneven settling.
- Vegetation: Mature trees extract soil moisture inconsistently, affecting stability.
- Structure Type: Slab-on-grade setups respond differently from pier-and-beam designs.
Anticipated Obstacles
Prepare for confined areas, poor airflow in crawl spaces, and disruptions from metal reinforcements or rebar. Design cable paths to minimize sharp angles or compression risks.
Selecting Appropriate Sensors
The choice of sensors determines the system's precision and dependability.
Option 1: Wireless Soil and Vibration Sensors
- Description: Small devices that track ground shifts and relay information via a central hub.
- Advantages: Straightforward setup with minimal wiring.
- Disadvantages: Periodic battery changes needed; signal range limits in thick substrates.
- Cost: Moderate.
- Required Skill: Intermediate.
Option 2: Wired Structural Strain Gauges
- Description: Instruments affixed to foundation elements to measure stretching or compressing.
- Advantages: Superior accuracy with uninterrupted power.
- Disadvantages: Involves more intrusive fitting and exposed wires.
- Cost: Higher end.
- Required Skill: Advanced.
Option 3: Moisture and Temperature Probes
- Description: Tools monitoring soil dampness and thermal changes.
- Advantages: Vital for preempting water-related harm.
- Disadvantages: Analyzing outputs often calls for software proficiency.
- Cost: Low to moderate.
- Required Skill: Beginner to intermediate.
Assembling Tools and Materials
Essential Hand Tools:
- Tape measure to determine sensor intervals.
- Screwdrivers for secure mounting.
- Level to align sensors properly.
Power Tools:
- Drill for creating anchor holes.
- Cordless driver to install fasteners.
Equipment to Rent:
- Moisture meter for verifying calibrations.
- Inspection camera to view inaccessible spots.
Required Materials:
- Sensors and central hub.
- Mounting clips and screws.
- Weather-resistant sealant.
- Cables and connectors.
Include a 10 percent surplus for miscellaneous fasteners and wiring components.
Step-by-Step Installation Instructions
- Map Sensor Positions: Outline locations around the foundation perimeter with chalk or adhesive tape. Uniform distribution guarantees comprehensive monitoring.
- Create Pilot Holes: Employ a masonry bit narrower than the anchors. Maintain shallow depths to avoid breaching moisture barriers.
- Secure Sensors: Fasten or clip units in position, ensuring they remain level and follow manufacturer orientation guidelines.
- Link Wiring or Sync Wireless Devices: Adhere to the system's manual for connecting sensors to the hub. Test signal quality prior to finalizing enclosures.
- Apply Protection: Coat mounting sites with sealant to repel water ingress.
- Configure Software: Connect the hub to the network and access the dashboard. Adjust calibrations against recorded baselines.
- Test Data Transmission: Verify consistent reporting from all sensors. Reposition as necessary if signals weaken or values fluctuate abnormally.
Quality Assurance: Confirm sensors sit plumb and level. Any deviation risks inaccurate measurements.
Practical Advice: Assign unique codes to each sensor area corresponding to your data layout. This approach streamlines future diagnostics.
Completing the Setup
Final Adjustments
Organize cables using clips or protective tubing for a neat appearance. House the hub in a durable, weatherproof enclosure if placed outside. Position the control interface for easy access during updates.
Ongoing Maintenance
Schedule monthly checks to clean sensors of debris and confirm connections remain tight. Replace batteries in wireless models every six to twelve months, depending on usage. Update software quarterly to incorporate new analytics features. Monitor dashboard alerts for anomalies, such as sudden moisture spikes, and log trends over time to predict seasonal shifts.
Avoiding Common Pitfalls
Overlook site assessment at your peril; improper placement leads to blind spots in coverage. Neglecting to call 811 risks utility damage and safety hazards. Rushing calibration without baselines produces unreliable data. Ignore sealant application, and moisture corrosion undermines sensor longevity. Finally, bypass professional input for complex readings, as misinterpretation delays critical interventions.
Realizing Long-Term Benefits
Implementing a predictive foundation system shifts maintenance from reactive to proactive. Homeowners gain peace of mind through real-time insights that preserve structural integrity and curb escalating repair costs. Regular monitoring not only extends the home's lifespan but also enhances property value by demonstrating diligent care. Embrace this technology to stay ahead of potential issues and ensure lasting stability.