3D-Printed Foundations: Achieving 60 Percent Faster Builds by 2026
Quick Overview
3D-printed foundations transition rapidly from experimental stages to practical construction sites. Initial results indicate completion times up to 60 percent shorter than those of conventional poured or block systems. Primary expenses stem from robotic equipment setup, material mixture calibration, and site readiness. The primary concern involves inconsistent curing or inadequate adhesion to soil and upper structural components.
Essential Site Evaluations
Homeowners and investors must assess the site and soil conditions prior to adopting printed foundations. This technology accelerates placement but does not eliminate the need for meticulous preparation. Focus on these fundamental aspects:
- Grading and drainage. Verify that surface water directs away from the building footprint to prevent pooling.
- Subgrade compaction. Inspect the area on foot; sinking footprints or friable soil signal insufficient density.
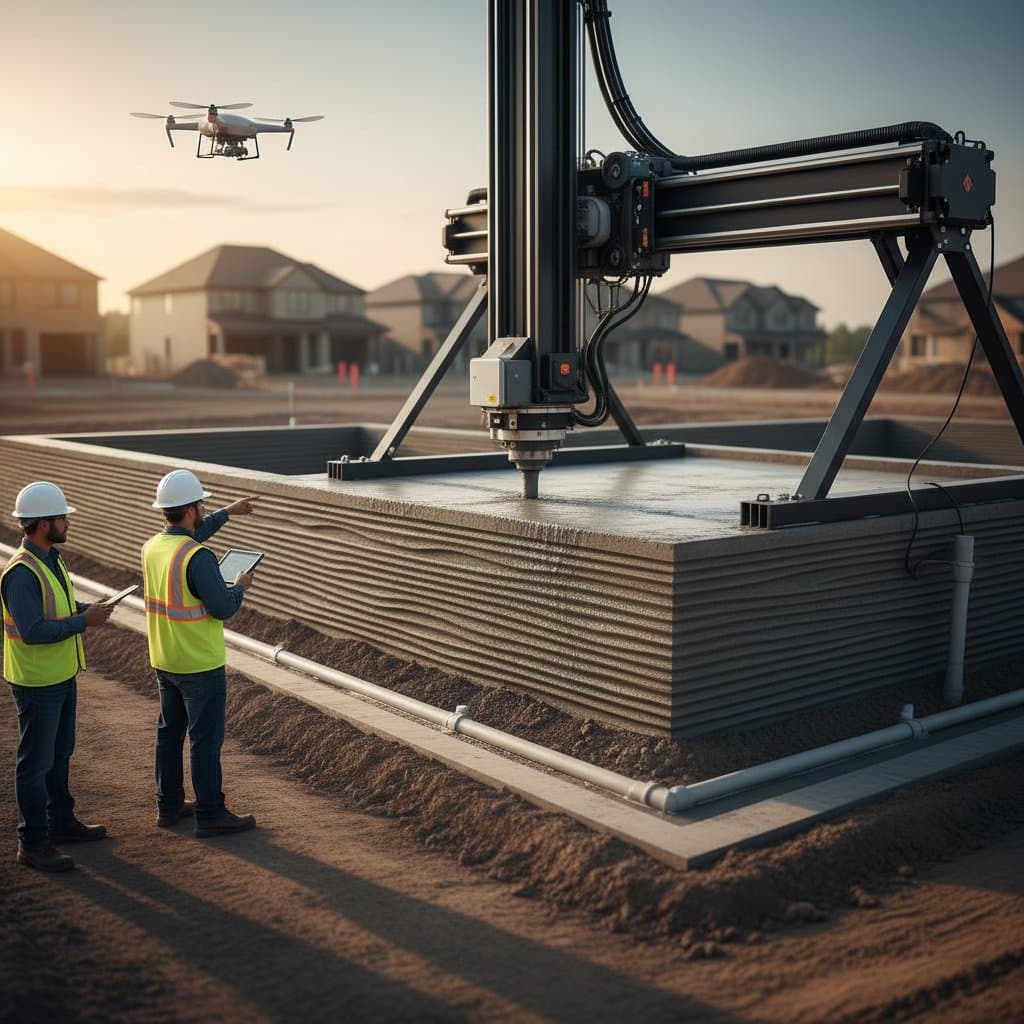
- Equipment access. Ensure stable pathways and unobstructed areas for robotic gantries or mobile printers.
- Weather considerations. Account for high humidity or subfreezing temperatures, which compromise layer bonding.
- Power and material supply. Secure reliable electricity for pumps and mixers; disruptions halt the printing process.
Reliable conditions prove essential for printed foundations. Hidden soft areas or subsurface water channels pose risks of future settling.
Critical Warning Signs
- Subgrade instability that moves during the printing operation.
- Absence of independent validation for the selected material formulation.
- Lack of engineering review for post-print load-bearing strength.
- Visible separations or defects in layered sections.
- Curing zones vulnerable to precipitation or erosion.
- Omitted specifications for anchors connecting to the framing system.
Such problems often lead to doubled repair expenses or partial rebuilds.
Common Solutions and Estimated Expenses
These foundations employ cement-based or geopolymer materials extruded in successive layers. Printers form ribs and cavities that reduce material use by as much as 30 percent. Key expense areas include initial setup, materials, and quality checks.
- Setup and calibration: Comprises 5 to 10 percent of overall project costs. Local operators with on-hand machinery minimize this figure.
- Material costs per square foot: Comparable to standard concrete, with specialized formulations commanding premiums.
- Printing duration: Ranges from one to three days for a typical single-family home base.
- Curing and verification: Aligns with timelines for traditional concrete.
- Overall installed cost: Generally 10 to 20 percent less than standard approaches at scale, though initial installations may exceed due to logistics.
Avoid cost-cutting measures that compromise quality. Inferior mixtures or neglected compaction assessments invite subtle shifts, resulting in floor fractures or framing misalignment. Post-print adjustments prove expensive; surface grinding or fillers merely mask vulnerabilities. Complete reprints or added slabs become necessary in severe cases.
Coordination challenges intensify when teams overlook integration among printer specialists, engineers, and carpenters. Rapid foundation completion demands precise anchor placements and level surfaces for subsequent work. Errors here negate time advantages.
Options for Repairs Versus Replacement
For printed elements: Minor fissures below one millimeter typically require only aesthetic sealing via epoxy or polymer injections. Significant structural issues, such as tilting sections or layer separation, necessitate excision and reprinting of impacted areas. Replacement suits situations where integrity evaluations indicate failure.
For existing poured foundations: Integrating printed components seldom justifies the investment. Prioritize enhancements in drainage, sealing, and reinforcement. Reserve printing for entirely new constructions or comprehensive overhauls.
Waterproofing applications: Employ conventional membranes or sprayed barriers post-printing. The textured surface promotes strong adherence. Never omit this layer; even robust printed materials permit moisture ingress without protection.
Framing integrations: Incorporate anchor recesses during printing. When adapting plans to 3D methods, align framing designs with these features. Discrepancies lead to extensive shimming and compromised load distribution.
Required Team Roles and Workflow
Successful projects demand synergy between digital experts and on-site personnel. Define responsibilities clearly.
- Structural engineer: Confirms soil load capacity, material specifications, and force transmission routes.
- Printer specialist: Adjusts extrusion speed, layer thickness, and curing schedules.
- General contractor: Oversees preparation, timelines, and integration of subsequent phases.
- Surveyor: Validates precise positioning pre- and post-printing.
- Specialized inspector: Evaluates curing progress, adhesion quality, and reinforcement placement.
Convene the team prior to mobilization. A focused planning session averts costly interruptions during active printing. Simultaneous reviews prevent delays and incompatibilities.
Dedicated project oversight adds 10 to 20 percent to budgets yet curbs overruns in robotic applications. It bridges gaps between virtual models and physical tolerances.
Key Focus Areas for Implementation
This approach excels in areas with consistent climates and firm soils. Variable environments extend preparation phases, diminishing speed gains.
Prioritize these elements for optimal results:
- Soil analysis and leveling as the initial action.
- Moisture control via perimeter drains or French systems.
- Precise digital simulations for access points, utilities, and anchors.
- Curing safeguards using enclosures or environmental controls.
Steer clear of intricate geometries that prolong printing or bespoke materials lacking regional availability. Sourcing difficulties inflate future maintenance costs.
Retain established features like boundary drainage, moisture barriers, and thermal insulation. Printing alters formation methods but not these necessities.
Budgeting and Phased Execution
3D printing compresses timelines without altering core principles. Sequence remains critical.
- Manage water flow immediately. Level the site, install drains, and route surface water outward.
- Stabilize and test the subgrade. Apply compaction equipment and conduct density measurements.
- Execute printing. Maintain environmental stability throughout.
- Allow curing and assessment. Use moist methods or coverings for specified periods.
- Add protective layers. Apply waterproofing and insulation.
- Position framing. Confirm flatness prior to vertical construction.
Dependencies link each phase. Accelerated printing fails to compensate for flawed groundwork. Proper ordering halves total duration, while lapses extend it.
Applications in Existing Structures
For aging properties, printed foundations tempt as remedies for deteriorating bases. Such applications seldom succeed without groundwork. Overlaying unstable earth invites ongoing subsidence. Elevate, underpin, or reconstruct the original before printing assists in confined repairs where forms prove cumbersome.
In heritage settings, leverage 3D printing to duplicate absent stonework or base elements rather than full substitutions. Digital scanning ensures profile fidelity, targeting only deficient portions. This method safeguards authentic fabrics and minimizes disruption.
Realized Benefits and Long-Term Value
Time savings arise primarily from streamlined setup and concurrent curing. Reduced labor demands fewer personnel. Design optimizations yield material efficiencies. Uniformity stands out; every layer adheres strictly to the model, minimizing placement variances.
Routine care remains vital. Printed concrete succumbs to thermal expansion, thawing cycles, or soil shifts. Sustain drainage efficacy, clear eaves troughs, and uphold slope gradients. Approach maintenance as with any concrete assembly; installation velocity does not exempt ongoing vigilance.
Safeguarding the Foundation
Establish a straightforward observation protocol post-installation.
- Inspect for emerging fissures biannually.
- Ensure gutter outlets direct water from perimeters.
- Monitor for salt deposits or moisture at edges.
- Control plant growth to preserve ventilation and avert root damage.
- Evaluate drainage systems following storms.
Detect subtle shifts promptly through periodic measurements with reference tools like lasers or taut lines. Persistent motion warrants consultation with engineers versed in printed composites. Early interventions forestall extensive corrections.
Advancing with Confidence
The vision of foundations completed in mere days materializes through rigorous execution. Velocity demands precision, not haste. Core tenets persist: dominate water, affirm stability, and orchestrate phases meticulously.
3D-printed foundations augment rather than supplant existing techniques, broadening options for streamlined, accurate construction. Homeowners advance best by initiating with soil scrutiny, drainage validation, and selection of collaborators who honor digital exactitude alongside time-tested skills.