Understanding Recycled Glass Concrete
Recycled glass concrete alters perspectives on sustainable construction for builders and homeowners alike. This material replaces portions of natural sand and gravel with crushed glass, thereby minimizing waste and producing a robust option with notable visual qualities. It merges ecological considerations with design flexibility, delivering both functionality and attractiveness.
This method tackles two primary issues in construction. Conventional concrete manufacturing depletes large quantities of natural aggregates, burdening quarries and natural habitats. Additionally, recycling programs for glass face challenges in utilizing post-consumer glass unsuitable for remelting. Incorporating such glass into concrete completes a vital cycle in waste management.
Why Recycled Glass Concrete Matters
Concrete ranks as the most prevalent building material worldwide. Enhancements to its sustainability yield widespread impacts. Using recycled glass diminishes reliance on raw materials and curbs landfill accumulation. Furthermore, it unlocks innovative designs, such as translucent surfaces or vibrant accents. For environmentally aware homeowners, architects, and hands-on creators, this concrete offers a practical advancement in responsible building.
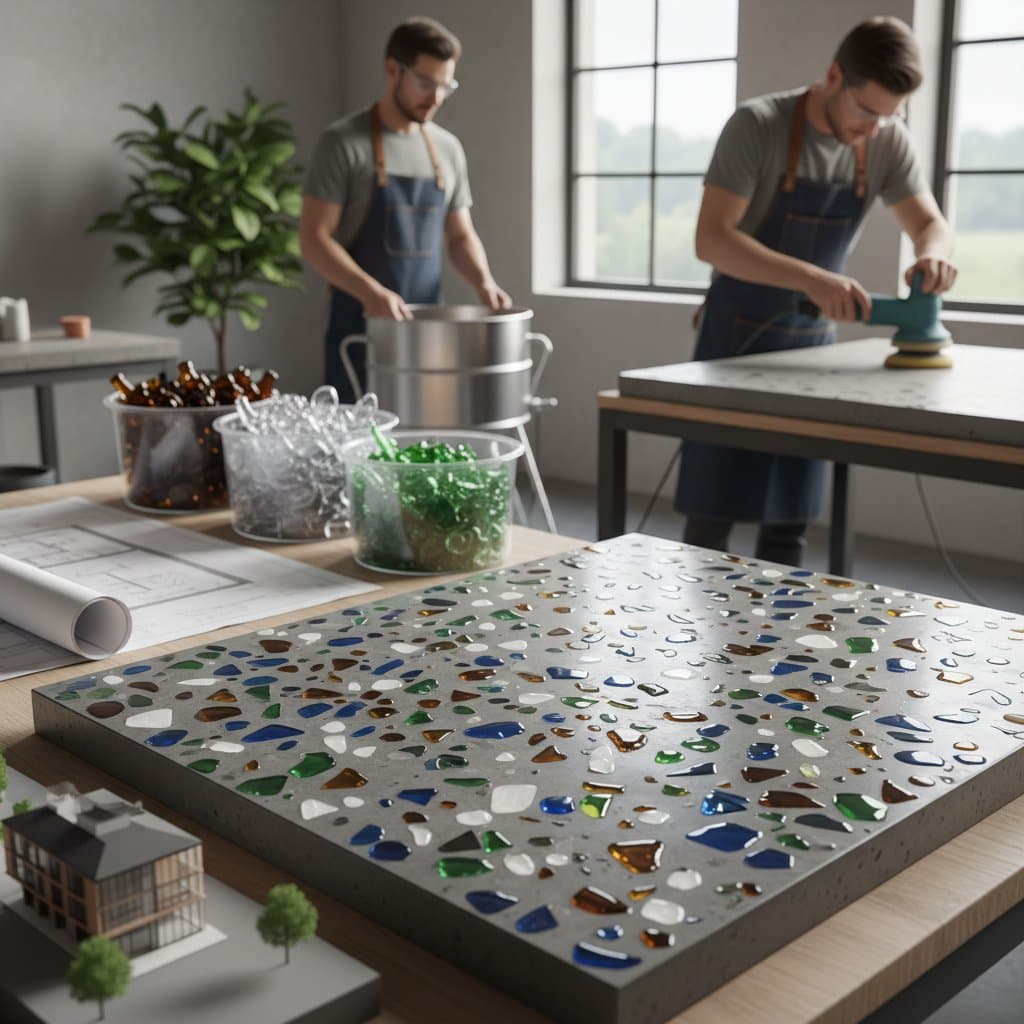
Deciding Between DIY and Professional Installation
Projects like a modest decorative countertop or garden stepping stone suit experienced individuals with foundational concrete knowledge. On a limited scale, mixing and pouring prove straightforward, and the outcomes provide satisfying results.
Larger structural applications, weight-bearing areas, or setups needing uniform curing conditions require expert involvement. Structural concrete necessitates exact mix formulations, precise water proportions, and adequate reinforcement. Errors may undermine safety and longevity. Individuals without advanced expertise should entrust substantial slabs, foundations, or upright forms to certified specialists.
Planning Your Recycled Glass Concrete Project
Thorough planning precedes any recycled glass concrete endeavor. This material responds differently than traditional mixes, so preparation determines outcomes.
Site Assessment
Examine the intended location for the concrete. Identify firm, well-draining terrain. Steer clear of zones prone to water accumulation or shifting ground. For exterior placements, verify that drainage prevents pooling adjacent to the slab. Weight-bearing surfaces demand soil compaction followed by a gravel underlayer for stability.
Key Measurements
Determine the area in square feet and desired thickness in inches to compute volume. Multiply length by width by thickness, then adjust cubic inches to cubic feet. Include a 10 percent allowance for waste and overflow. Uniform thickness promotes consistent curing and minimizes fracture risks.
Environmental Considerations
Ambient temperature and humidity influence curing duration. Select moderate, steady weather for work. High temperatures hasten drying and invite cracks, whereas low temperatures slow the hydration process.
Potential Challenges
Glass elements render the mixture more abrasive to equipment. Certain recycled glass might include contaminants or residues that hinder adhesion. Select vendors offering cleansed and sized glass specifically for concrete applications.
Selecting Materials
The aggregate forms the project's foundation. Consider these three prevalent strategies.
Option 1: Full Recycled Glass Aggregate
- Description: Employs crushed glass as the main aggregate component.
- Pros: Optimizes ecological advantages, delivers intense color and shimmer, and lessens mining activities.
- Cons: Demands meticulous mix adjustments to avoid alkali-silica reactions that lead to fractures.
- Cost: Ranges from moderate to elevated, based on hue and granule size.
- Skill Level: Intermediate to advanced.
- Best Uses: Decorative panels, countertops, non-load-bearing slabs.
Option 2: Partial Glass Blend
- Description: Substitutes some sand or gravel with glass.
- Pros: Simplifies management, preserves structural integrity while incorporating aesthetic elements.
- Cons: Yields subtler visuals, requires compatibility verification.
- Cost: Marginally above standard concrete pricing.
- Skill Level: Beginner to intermediate.
- Best Uses: Patios, pathways, landscape elements.
Option 3: Surface-Seeded Glass
- Description: Embeds colored glass fragments into the upper layer of wet concrete.
- Pros: Straightforward application, ideal for novice efforts, exerts negligible influence on structure.
- Cons: Limits effect to the exterior, necessitates sealing for longevity.
- Cost: Economical.
- Skill Level: Beginner.
- Best Uses: Stepping stones, tabletops, edging details.
Essential Tools and Materials
Hand Tools
- Concrete Trowel: Levels and refines the surface; indispensable for completion.
- Margin Trowel: Aids in blending small quantities and detailing edges.
- Rubber Float: Distributes glass uniformly without surface damage.
- Measuring Bucket: Maintains accurate proportions in mixes.
Power Tools
- Concrete Mixer or Paddle Mixer: Achieves uniform integration of glass and cement; consider rental options.
- Angle Grinder with Diamond Pad: Refines exposed glass for a polished appearance.
- Wet Vacuum: Clears residue during finishing processes.
Rental Equipment
- Plate Compactor: Prepares foundational layers for exterior slabs; acquire for short-term use.
- Concrete Vibrator: Eliminates air voids in thicker pours; apply judiciously to retain glass positioning.
Materials Checklist
- Portland cement
- Potable water
- Recycled glass aggregate
- Optional sand or gravel for blending
- Concrete sealer
- Reinforcement mesh or rebar for structural needs
- Form boards and release agent
- Safety gear including gloves, goggles, and respirator
Acquire 10 percent additional aggregate to account for handling losses.
Step-by-Step Project Guide
- Site Preparation: Even out the base, compact the soil, and incorporate gravel if required. A firm foundation averts future cracks.
- Form Installation: Position boards securely around the area. Coat with release agent to facilitate disassembly.
- Mixing the Batch: Blend cement, water, and glass aggregate. Maintain a low water-to-cement ratio for optimal strength.
- Pouring and Distributing: Introduce the mix evenly into forms. Employ a shovel or rake to fill edges.
- Consolidation: Strike the forms or activate the vibrator to expel air bubbles. This enhances overall integrity.
- Leveling and Smoothing: Align with a screed board, followed by trowel application for evenness.
- Surface Enhancement (Optional): Embed decorative glass lightly into the top layer.
- Curing Process: Retain moisture on the surface for days using sheeting or compounds.
- Polishing Stage: After full curing, progressively abrade with diamond tools to expose glass uniformly.
- Sealing Application: Coat with premium sealer to guard against stains and water ingress.
Expert Recommendations
Acquire 10 percent surplus glass to offset breakage and shade inconsistencies. In regions with freeze-thaw cycles, opt for finer glass particles to mitigate expansion risks. Adhere to supplier guidelines for cement-glass ratios to sidestep adverse reactions.
Extending the Benefits of Your Project
Recycled glass concrete not only enhances immediate structures but also contributes to broader sustainability goals. Homeowners who incorporate this material support reduced resource consumption and innovative waste reduction. Future expansions, such as integrating it into larger renovations, amplify these advantages while maintaining aesthetic and functional excellence.