Understanding Eco-Brick Masonry
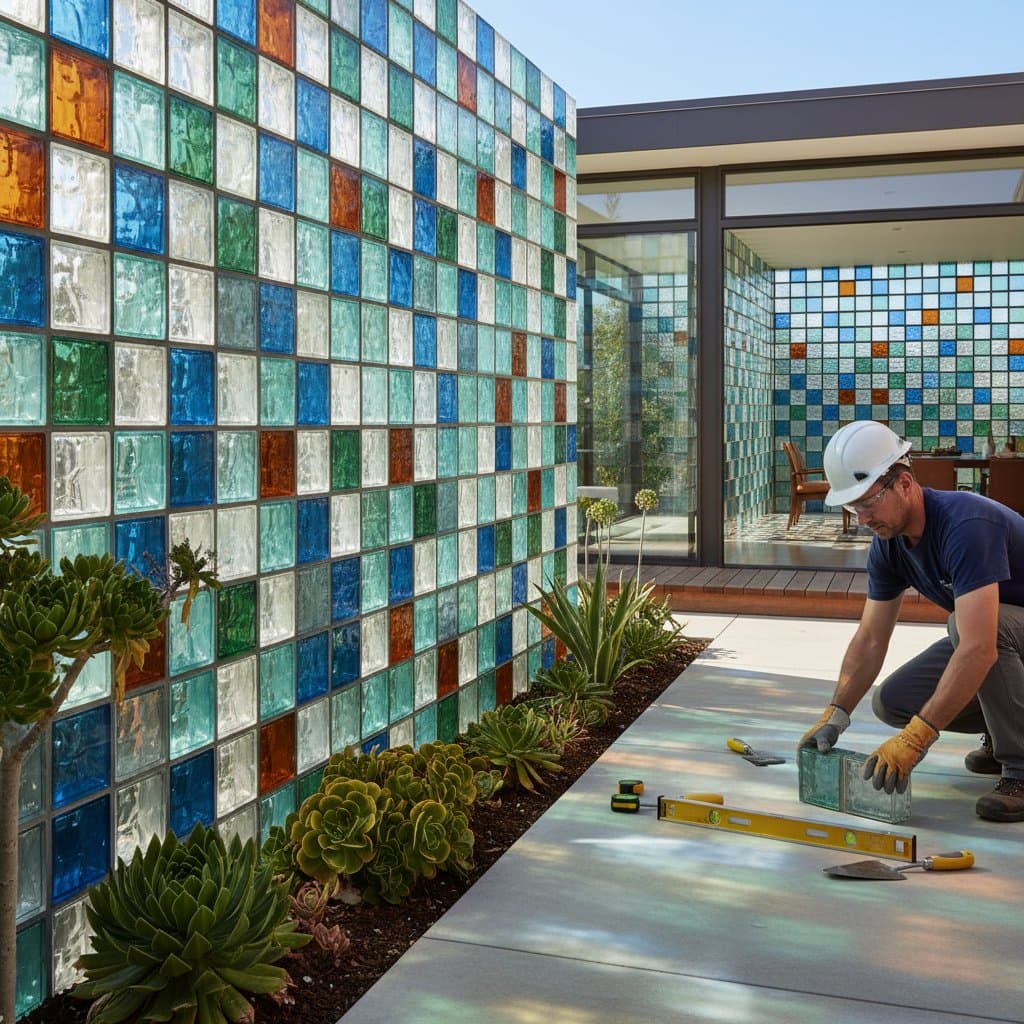
Eco-brick masonry constructed from recycled glass reshapes approaches to sustainable walls, facades, and decorative structures. Builders and designers value these bricks for their use of crushed or melted post-consumer glass as the primary binder or aggregate, unlike traditional fired clay or concrete options. This method yields striking color variations, translucency, and durability while diverting landfill waste. The transformation of glass bottles and industrial scrap into functional architectural elements supports both structural and ornamental applications.
Projects involving recycled glass bricks require intermediate to advanced skills. Confident DIY enthusiasts manage small-scale installations or accent features, but structural walls or load-bearing assemblies demand professional masons or engineers. Workers encounter sharp edges, heavy loads, and the need for precise alignment, necessitating protective gear and safe lifting techniques.
Environmental and Aesthetic Benefits
Conventional masonry draws heavily on natural sand, clay, and firing fuels, leading to significant resource consumption. Recycled glass bricks substitute these inputs, thereby reducing energy demands and preserving raw materials. They align with circular economy principles by repurposing discarded glass. Each square foot of such a wall equates to diverted waste from landfills. These benefits pair with design advantages, as the bricks allow light transmission, illumination glow, and color reflection from surroundings.
Ideal Applications
Recycled glass bricks suit garden walls, interior partitions, accent facades, retaining walls, and decorative paving. Professionals often integrate them with standard brickwork to introduce texture or transparency. The material scatters daylight effectively, fostering visual depth without additional finishes like paint or coatings. In outdoor environments, the bricks withstand moisture and stains when paired with appropriate mortar and drainage systems.
Assessing Project Scope
DIY participants handle modest decorative efforts, including low landscape walls or indoor panels, provided they possess basic bricklaying proficiency. Load-bearing structures, major supports, or extensive retaining walls necessitate expert involvement in design and reinforcement. Individuals without engineering expertise or structural masonry background should engage qualified masons or consultants.
Selecting Materials
Material choices influence both visual appeal and functional performance. Recycled glass bricks vary by production method, each offering distinct characteristics.
Fused Glass Bricks
Manufacturers melt crushed glass into molds at high temperatures to create these dense, translucent units, available in clear, frosted, or tinted varieties.
- Advantages: Superior compressive strength, consistent dimensions, and smooth surfaces that enhance light reflection.
- Disadvantages: Greater weight compared to alternatives, demanding accurate cutting.
- Pricing: Higher than conventional bricks.
- Required Expertise: Intermediate to advanced.
- Upkeep: Clean periodically with mild detergent.
- Optimal Uses: Interior partitions or accent walls emphasizing light passage.
Pressed Aggregate Glass Bricks
These units blend crushed glass aggregate with resin or cement binders, displaying colorful chips and terrazzo-like texture.
- Advantages: Unique visual interest, affordability relative to fused options, and simpler cutting process.
- Disadvantages: Marginally lower structural integrity and increased porosity.
- Pricing: Moderate.
- Required Expertise: Intermediate.
- Upkeep: Apply sealant every few years to resist stains.
- Optimal Uses: Garden walls, decorative facades, and low-height retaining structures.
Hollow Glass Blocks from Recycled Glass
Produced from post-consumer glass akin to traditional blocks, these feature internal air pockets for enhanced insulation.
- Advantages: Effective light diffusion, improved thermal performance, and lighter weight.
- Disadvantages: Limited load capacity without added support, necessitating specific spacers.
- Pricing: Moderate to higher.
- Required Expertise: Beginner to intermediate.
- Upkeep: Wipe surfaces occasionally.
- Optimal Uses: Bathroom enclosures, stairwell panels, and exterior accent strips.
Installation Guide
Establish the Foundation
Dig a trench 8 inches deep and 4 inches wider than the planned wall thickness. Compact gravel into the base, then pour a 4-inch concrete footing. Verify levelness across all planes. Permit full curing prior to proceeding, as a solid foundation averts future shifts and fractures.
Position the Initial Course
Mark a chalk line on the footing. Apply a 3/8-inch mortar bed along this guide. Place the first brick at the corner, pressing firmly. Proceed row by row, using a level to maintain alignment and uniform joints. Precision in this layer sets the foundation for the entire build.
Construct Subsequent Courses
Spread mortar on the prior course, offsetting vertical joints in a running bond pattern. Check levelness after every few bricks. Secure each unit with light taps from a rubber mallet to ensure adhesion. Squeeze out surplus mortar promptly to prevent hardened residues on glass faces.
Incorporate Reinforcement as Needed
In walls exceeding 3 feet or subject to wind loads, install mesh reinforcement every second or third course. Embed the mesh completely within the mortar to inhibit corrosion. Prevent direct contact between metal and glass surfaces.
Install Expansion Joints
Create vertical gaps of 3/8 inch every 10 to 12 feet. Fill these with flexible sealant post-construction. Such joints accommodate thermal expansion and contraction, minimizing crack risks.
Complete the Top Course
Finish with a level cap course or coping stones to direct water away. Distribute mortar evenly, then tool joints for consistency. Remove residues using a damp sponge before setting occurs.
Final Curing and Protection
Allow several days for curing. Apply a clear sealer to applicable brick types once dry, boosting color vibrancy and stain resistance. For indoor applications, buff surfaces gently to achieve luster.
Practical Enhancements and Upkeep
Refining the Appearance
After sealing, buff exposed areas with a microfiber cloth. For interior walls, embed LED strips at base or top edges to amplify translucency. Exterior setups gain drama from low-voltage uplights accentuating nighttime textures.
Ongoing Maintenance
Examine mortar joints yearly for wear. Refresh sealant as dullness or moisture ingress appears, typically every few years. Clean glass with mild detergent and soft cloths, steering clear of abrasives. In outdoor installations, maintain drainage and remove base debris regularly.
Design Integrations
Combine recycled glass walls with planters, seating, or water elements. A garden wall serves as both privacy barrier and light diffuser. Contrast with reclaimed wood or metal accents. Indoor dividers using frosted variants balance seclusion and illumination.
Pitfalls to Sidestep
- Omitting the Footing: Results in settlement issues and cracks.
- Incompatible Mortar: Standard cement may not adhere properly; select glass-compatible formulations.
- Forgetting Expansion Joints: Thermal shifts lead to fractures without them.
- Delayed Cleaning: Set mortar mars glass clarity; address joints immediately.
- Poor Alignment: Light through glass reveals flaws, requiring vigilant leveling.
Halt work upon noticing misalignment after multiple courses, and rebuild the section. Seek professional advice for cracks or distortions.
Professional Involvement and Broader Impact
Engage experts for complex builds involving structural integrity or regulatory compliance. Certified masons ensure safety and longevity in demanding projects.
Adopting recycled glass bricks advances sustainable practices, reducing waste and innovating design. These materials empower builders to create enduring, visually compelling structures that harmonize environmental stewardship with architectural excellence.