- Key decision factors: Evaluate sun exposure, budget constraints, compatibility with your electrical system, and adherence to local permit regulations before proceeding.
Understanding Solar Pavers and Their Operation
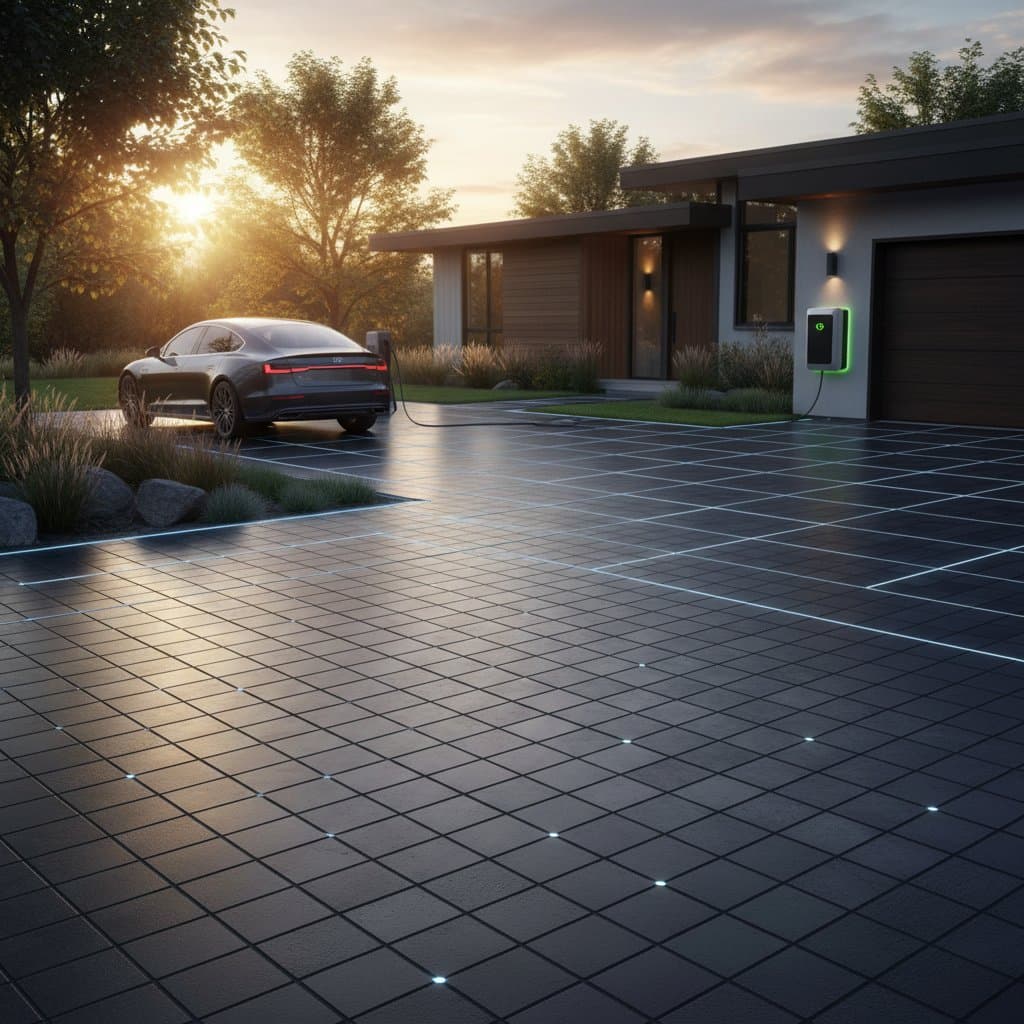
Solar pavers, also known as photovoltaic pavers, embed solar cells within robust paving materials. These units feature protective layers of tempered glass or composites that safeguard the underlying photovoltaic components. Sunlight hitting the surface triggers the cells to produce direct current electricity, which routes to an inverter for conversion into usable power to supply a home or recharge storage batteries.
Types of Solar Pavers
-
Monocrystalline Units:
These achieve superior efficiency levels of 18 to 22 percent, though their intricate production process increases costs. Select them for smaller driveways that receive ample direct sunlight throughout the day. -
Polycrystalline Units:
With efficiencies ranging from 15 to 17 percent, these provide a budget-friendly alternative. They suit expansive areas where managing overall expenses takes priority over peak performance per unit. -
Hybrid Composite Pavers:
These incorporate photovoltaic films into bases of reinforced resin or concrete. Although power density remains lower, they excel in traction and support for heavy loads, making them practical for high-traffic zones.
Benefits and Limitations
Advantages:
- Produce renewable electricity straight from the driveway without relying on additional structures.
- Eliminate the need for roof installations, preserving aesthetic appeal and avoiding potential roof damage.
- Deliver weather-resistant durability capable of supporting vehicle weights up to several tons.
- Enhance property values and qualify for various renewable energy tax credits or rebates.
Limitations:
- Involve upfront expenses that exceed those of conventional paving options.
- Yield slightly reduced efficiency compared to optimally angled roof panels, influenced by ground-level positioning and possible shading.
- Demand expert electrical connections to satisfy safety codes and ensure reliable performance.
Planning Your Solar Paver Project
Start by assessing your site for sunlight hours, terrain slope, water drainage patterns, and proximity to electrical infrastructure. Such thorough evaluation supports both the pavement's longevity and its energy production potential.
Permits and Regulatory Compliance
Local authorities typically mandate permits for electrical and structural modifications in photovoltaic projects. Prepare a detailed site plan that illustrates conduit paths, inverter locations, and grounding configurations. Verify alignment with regional electrical standards and utility guidelines for grid connection. Engage a certified professional for design validation to expedite approvals and avoid delays.
Budgeting and Cost Analysis
Expect total system expenses to range from $80 to $120 per square foot installed. Breakdown includes:
- Materials (45 percent): Encompasses pavers, wiring connectors, and protective conduits.
- Labor (35 percent): Accounts for site excavation, precise grading, and comprehensive electrical integration.
- Equipment (20 percent): Covers tools like compactors, inverters, and diagnostic devices.
Although pricier than basic concrete or brick alternatives, the embedded energy generation capability recoups investments gradually. Integrated systems often deliver 10 to 15 percent savings on annual electricity bills.
Site Evaluation Techniques
Conduct a solar resource analysis with a portable irradiance meter or hire an expert to quantify daily sunlight across the proposed area. Steer clear of regions obscured by trees, buildings, or overhangs. Target locations that capture a minimum of six hours of unobstructed sunlight daily to optimize output reaching 20 to 50 watts per square foot.
Preparing the Installation Site
Site readiness forms the foundation for a resilient and efficient setup. Clear debris and establish a solid base to accommodate both paving demands and wiring pathways.
-
Excavation and Grading:
Remove existing soil or pavement to depths of 8 to 10 inches. Establish a gentle slope of 1 inch drop over every 8 feet to facilitate water runoff and prevent pooling. -
Sub-Base Installation:
Compact 4 to 6 inches of crushed stone aggregate to form a stable foundation. This layer distributes loads evenly and conceals wiring routes securely. -
Conduit Placement:
Embed underground-rated Schedule 80 PVC conduits at a minimum depth of 12 inches. These pathways transport electrical lines from pavers to the central inverter without exposure to surface wear. -
Bedding Material Application:
Distribute 1 inch of coarse sand or fine gravel evenly. This cushion enables fine adjustments during paver alignment for a level finish.
Step-by-Step Installation Guide
1. Laying the Solar Pavers
Position units according to your predefined layout, ensuring seamless alignment of electrical connectors between adjacent pieces. Tap them into place with a rubber mallet to avoid damaging the protective glass layers.
2. Wiring Connections and Junction Boxes
Link the built-in leads from each paver using waterproof couplers to neighboring units. Direct these circuits into sealed junction boxes spaced every 10 to 15 feet along the installation. Apply dielectric grease on contacts to resist moisture and corrosion over time.
3. Inverter and System Integration
Channel all collected wiring to a grid-tied inverter mounted in a weatherproof enclosure adjacent to your home's electrical panel. This device transforms direct current into alternating current compatible with household appliances. Double-check polarity orientations and grounding connections prior to activating power flow.
4. Joint Sealing and Performance Testing
Introduce polymeric sand into gaps between pavers to secure positioning and inhibit weed intrusion. Once sealed, employ a multimeter to measure output voltages across circuits. Document initial production metrics to benchmark against ongoing performance.
DIY Versus Professional Installation
For smaller projects or those with experienced participants, DIY installation offers cost savings and hands-on involvement. Gather necessary tools like levels, mallets, and electrical testers, and follow manufacturer guidelines meticulously to uphold warranties. However, professional services prove essential for complex sites involving extensive wiring or regulatory hurdles, ensuring code compliance and optimal efficiency. Consult certified installers through solar associations to weigh options based on your skill level and project scale.
Ensuring Long-Term Quality and Performance
Precision in both structural and electrical aspects guarantees sustained reliability. Implement these verification steps:
- Secure all joints with silicone seals or gaskets to block water entry.
- Examine pavers for hairline fractures prior to placement.
- Confirm inverter functionality stays within specified input voltage tolerances.
- Minimize cable lengths to reduce energy dissipation during transmission.
Permit the completed surface to cure for 48 to 72 hours before subjecting it to vehicle traffic. Conduct weekly output reviews post-installation to detect and address any deviations early.
Addressing Common Installation Challenges
Reduced Power Generation:
Investigate sources of obstruction such as accumulating leaves, dirt, or disconnected wires. Restore surfaces with a solution of mild soap and water, steering clear of harsh scrubbers that could etch the glass.
Water Infiltration Problems:
Examine seals and enclosures following storms. Swap out compromised components promptly to avert internal rusting.
Surface Unevenness:
Should sub-base shifts cause tilting, excavate and reposition affected pavers after re-compacting the underlying material.
Solar Driveway Maintenance Practices
Consistent upkeep preserves energy yield and visual appeal.
-
Surface Cleaning:
Rinse every two to three months using a soft brush and non-abrasive cleaner to eliminate grime buildup. -
Structural Inspections:
Quarterly reviews for signs of cracking or separation. Replace any compromised units swiftly to safeguard the system's integrity. -
Output Tracking:
Utilize the inverter's display to log kilowatt-hour production. Investigate drops exceeding 10 percent, which may indicate wiring faults or increased shading. -
Seasonal Considerations:
In colder months, apply salt-free de-icers. Opt for plastic tools to clear snow without risking surface scratches.
With diligent care, these systems endure 25 years or longer, requiring only occasional updates to wiring or seals.
Advancing Your Home's Sustainable Infrastructure
Solar pavers fuse innovative energy capture with practical hardscaping, elevating driveways into productive assets. Grasp their technical foundations, financial implications, and care protocols to determine alignment with your goals. Through meticulous site preparation, skilled execution, and vigilant monitoring, transform your driveway into a resilient contributor to household energy independence.