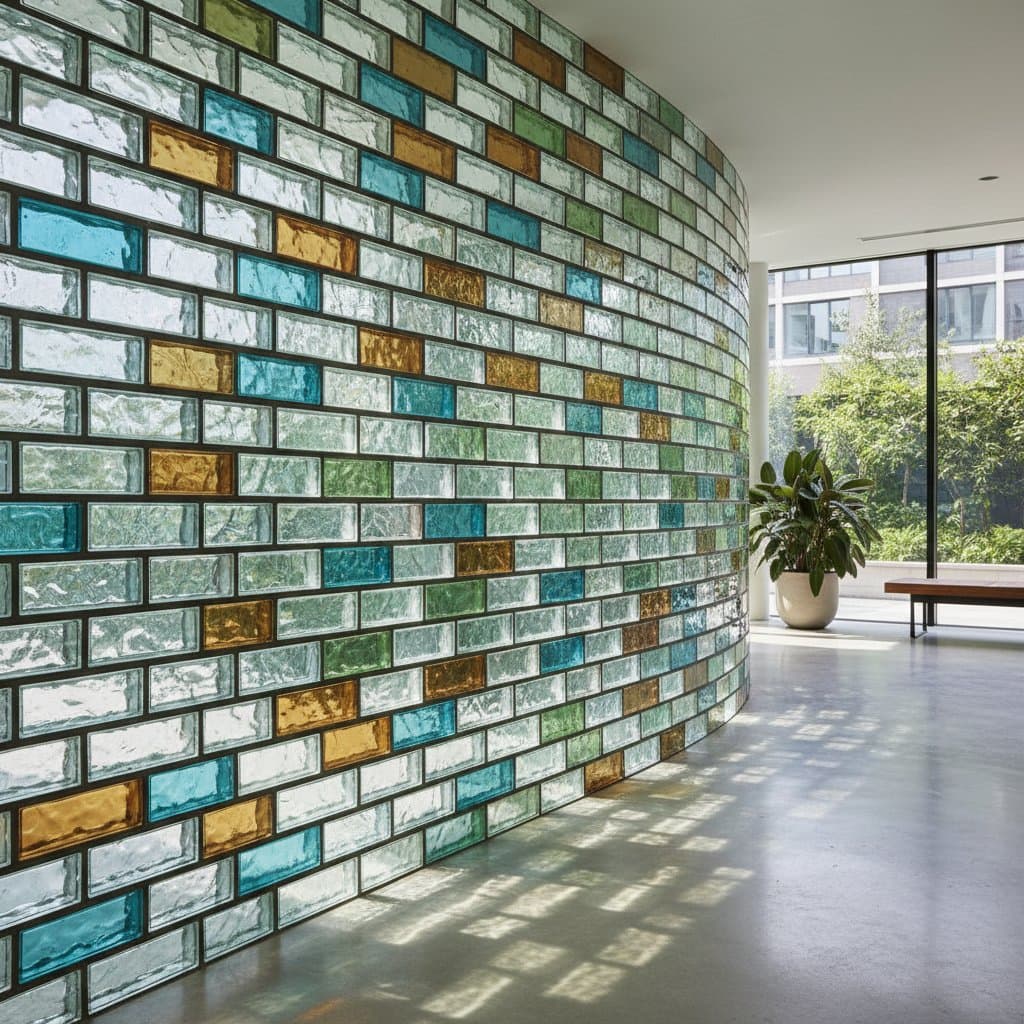
Understanding Recycled Glass Bricks
Recycled glass bricks offer a modern alternative to traditional masonry materials. Engineers produce them by melting post-consumer or industrial glass waste and casting it into standardized blocks. This process yields a strong, non-porous product that allows light to pass through while diverting waste from landfills.
These bricks support both functional and creative applications in construction. Architects value their capacity to diffuse light for privacy in spaces like bathrooms or offices. At the same time, their resistance to moisture and decay makes them reliable for long-term use.
On a larger scale, recycled glass bricks promote a circular economy in building practices. By repurposing existing glass, production cuts down on raw material extraction and energy use. This approach aligns with global efforts to reduce construction's environmental footprint.
Skill Level and Project Scope
Intermediate builders with masonry basics can handle recycled glass brick projects. The material demands precise cutting and alignment, so beginners should start small. For major builds like load-bearing walls, engage a professional mason or engineer to ensure safety and compliance.
Suitable DIY projects include decorative walls, garden dividers, or illuminated paths. These require planning for tools and safety but allow hands-on involvement. Always prioritize structural integrity in any installation.
Why Recycled Glass Bricks Matter
Traditional materials like clay bricks or concrete blocks depend on energy-intensive mining and processing. Recycled glass bricks sidestep these issues by utilizing waste streams. Their production emits fewer greenhouse gases and conserves natural resources.
Aesthetically, these bricks stand out with their soft light transmission. This feature suits interiors needing illumination without full visibility, such as stairwells or feature walls. The result combines privacy with a warm, natural glow.
Performance-wise, the bricks' sealed surfaces prevent stains, fading, and mold. They thrive in damp environments or exterior settings. Textured faces scatter light to minimize harsh shadows, improving usability in various lighting conditions.
When to Hire a Professional
Homeowners can manage non-structural installs like backsplashes or garden accents. However, load-bearing elements demand expert input for reinforcement and code adherence. Consult a licensed mason to evaluate plans early.
Integrating electrical or plumbing systems into glass brick assemblies requires certified specialists. Professionals ensure safe embedding of wires or pipes. Skip these tasks without proper qualifications to avoid hazards.
Planning Your Recycled Glass Brick Project
Assessing the Site
Identify locations where light diffusion adds value, such as privacy screens or outdoor borders. Interior spots like hallways benefit from natural light enhancement. Exterior areas gain from reflective qualities that accentuate landscaping.
Verify the foundation's stability and levelness. It must bear the weight of bricks plus mortar without settling. Steer clear of zones prone to shifting soil or water pooling.
Measurements to Take
Determine the structure's dimensions in height, width, and depth. Factor in 0.25-inch mortar joints for accurate brick counts. Order 10 percent more to account for cuts and mishaps.
Environmental Factors to Consider
Temperature fluctuations cause minor expansion in glass. Use expansion-tolerant mortars or silicone for outdoor setups. In freezing areas, select frost-proof mixes and design for drainage to avoid damage.
Obstacles to Expect
Precise cuts demand diamond blades and safety equipment. Lifting multiple bricks tires the body, so schedule breaks and seek assistance. Protect against cuts with gloves, goggles, and sturdy clothing.
Choosing Materials
Option 1: Recycled Solid Glass Bricks
Solid versions feature full clarity or subtle tints for bright effects. They excel in high-traffic areas due to robustness.
- Pros: Superior strength, vivid light play, fully waterproof, easy upkeep
- Cons: Substantial weight, needs robust foundation
- Relative cost: Higher end
- Skill level: Intermediate to advanced
Option 2: Hollow Glass Blocks
These form from fused shells with internal space, reducing overall mass. Patterns vary for customized looks and added insulation.
- Pros: Simpler to maneuver, better heat retention, diverse designs
- Cons: Reduced impact resistance, not for heavy loads
- Relative cost: Mid-range
- Skill level: Beginner to intermediate
Option 3: Composite Recycled Glass Bricks
Blends of crushed glass and binders create versatile, user-friendly blocks. They approximate glass aesthetics with simpler handling.
- Pros: Featherlight, straightforward cutting, multiple surface options
- Cons: Diminished light passage, strength varies by formula
- Relative cost: Budget-friendly
- Skill level: Beginner
Gathering Tools and Materials
Hand Tools
- Trowel: Applies mortar smoothly for joints.
- Margin trowel: Targets tight gaps effectively.
- Level: Maintains straight lines in all directions.
- Rubber mallet: Positions bricks firmly without damage.
Power Tools
- Wet saw with diamond blade: Delivers clean cuts on glass.
- Drill with mixing paddle: Achieves even mortar blends.
Rental Equipment
- Scaffolding or work platform: Supports elevated work safely.
- Glass-cutting table: Aids precision for larger jobs.
Materials List
- Recycled glass bricks with 10 percent surplus
- Glass-compatible mortar
- Silicone for flexible joints
- Reinforcement mesh as recommended
- Safety gear including gloves and eyewear
Step-by-Step Installation
- Prepare the base. Clear debris and ensure flatness. A solid start avoids future instability.
- Lay out the pattern. Arrange bricks dry to test fit and balance. Refine the design on the spot.
- Mix mortar. Adhere to guidelines for ideal thickness. Steer clear of runny batches.
- Apply first mortar bed. Distribute a uniform half-inch layer along the bottom.
- Set the first row. Place bricks carefully and verify levelness progressively.
- Add vertical joints. Mortar ends and join units, scraping off surplus.
- Insert reinforcement mesh. Place it in designated rows for support.
- Continue stacking. Build course by course, checking alignment often.
- Finish top course. Even out joints for a polished finish.
- Seal joints. Add silicone after curing to handle shifts and block water.
Quality Checkpoint: Confirm the assembly stays true to plumb and square. Adjust gently before setting. Stock extra bricks for contingencies.
Pro tip: Extra materials prevent delays from breakage.
Finishing and Maintenance
Remove residue with a wet sponge promptly. Buff indoor surfaces for shine post-cure. Apply sealants outdoors for weather protection.
Routine care involves soap washes only. Skip harsh cleaners to preserve integrity. Check seals yearly and repair cracks promptly.
Pro tip: Sealed joints in cold zones guard against ice expansion.
Enhancing Your Glass Brick Installation
Incorporate LED strips for dynamic lighting effects. Mix with natural elements like timber for textured appeal. Select complementary palettes to amplify the bricks' subtle colors.
Sustaining Zero-Waste Practices in Your Build
Extend the eco-benefits by sourcing local materials and minimizing on-site waste. Reuse scraps where possible and recycle leftovers. This commitment reinforces the project's green ethos.